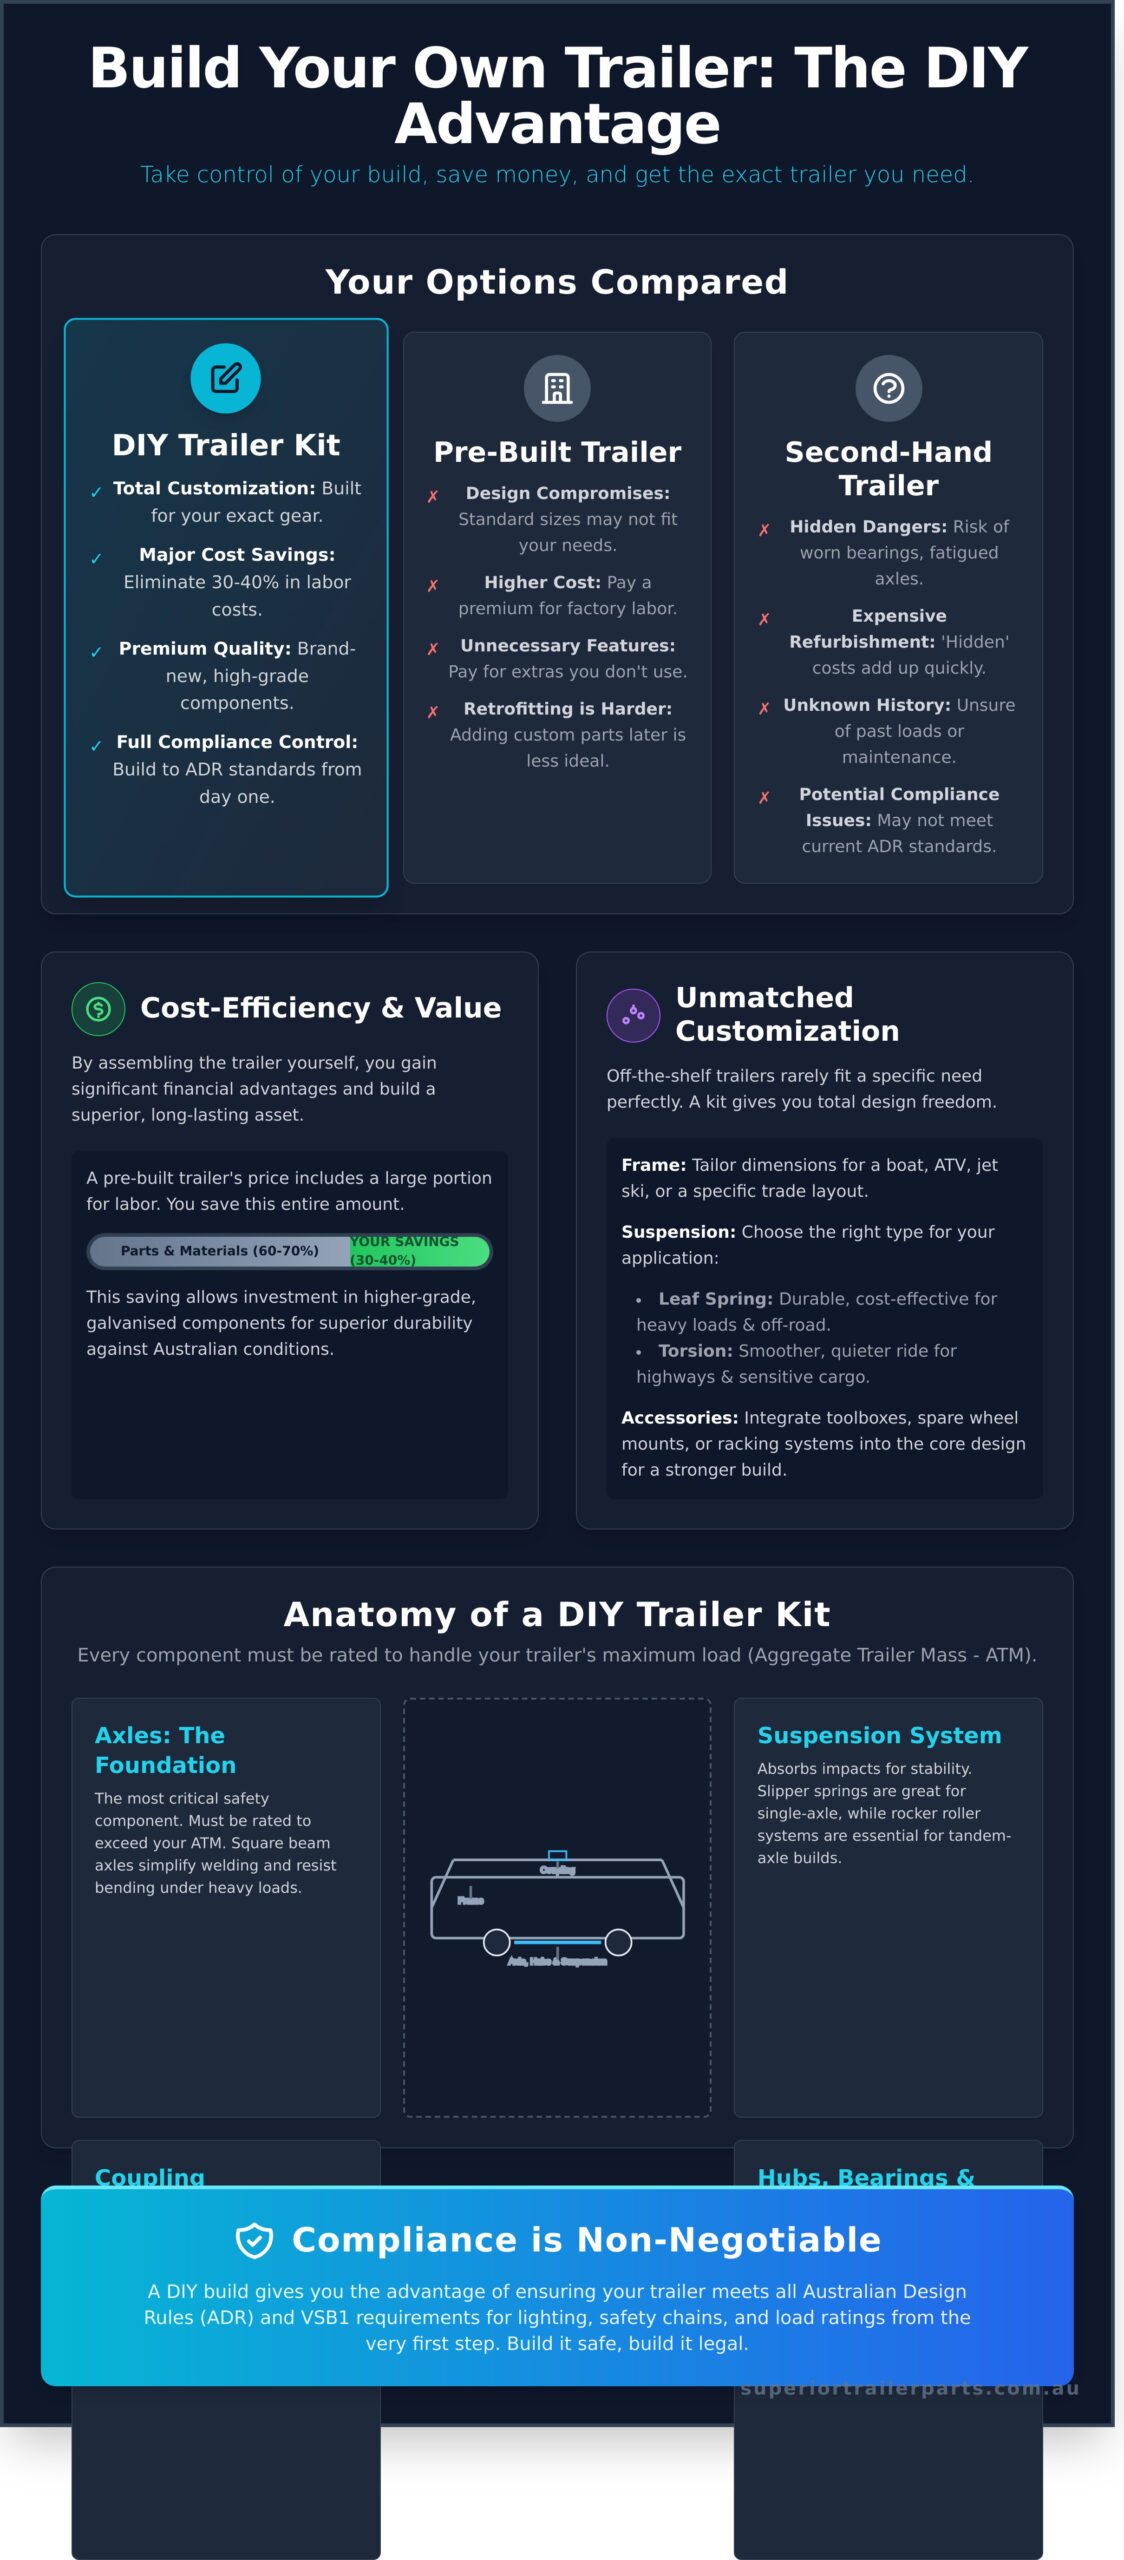
Paying for a pre-built trailer often means compromising on design and paying for features you simply don’t need. The best solution is the one you build yourself, tailored to your exact gear and specifications. It’s a practical way to get a heavy-duty trailer while keeping your costs firmly in check.
We understand the challenges. You want to build your own trailer kit australia, but you’re facing confusing weight ratings like ATM, the risk of buying incompatible parts, and the critical need for Australian Design Rule (ADR) compliance. This guide removes that guesswork. It provides a straightforward plan for selecting and assembling the right mechanical components for a safe, reliable, and road-legal trailer that saves you money.
We will cover matching your axles and brakes to your required load capacity, understanding coupling requirements, and ensuring every part works together for a dependable build that lasts. Let’s get the job done right.
Key Takeaways
- Correctly calculate your trailer’s required Aggregate Trailer Mass (ATM) to select a kit that safely handles your payload and matches your vehicle.
- Navigate the essential Australian Design Rules (ADR) and VSB1 requirements for lighting and safety chains to ensure a compliant, road-legal trailer.
- A DIY approach offers significant cost savings and customisation. See why using a build your own trailer kit australia is a practical alternative to buying pre-built.
- Discover the correct installation sequence for suspension parts, starting with proper chassis preparation for a square and reliable foundation.
Advantages of Using a DIY Trailer Kit for Your Project
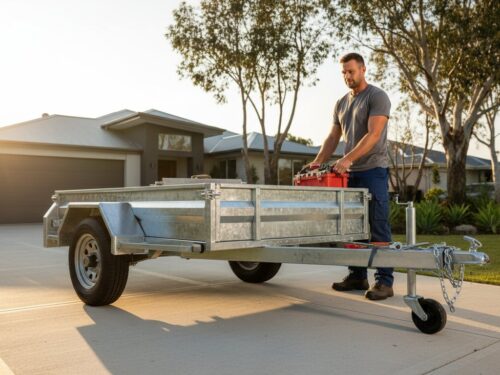
Opting to build your own trailer is a practical decision for any serious project. A DIY kit offers a cost-effective alternative to purchasing fully assembled premium trailers and sidesteps the risks of the second-hand market. It puts you in complete control, ensuring the final product meets your exact specifications without compromise.
A quality build your own trailer kit australia package provides all the essential, high-grade mechanical components in one delivery. This simplifies the assembly process significantly. You avoid the time-consuming task of sourcing individual hardware pieces from multiple suppliers. Instead, you get a matched set of parts engineered to work together, giving you the confidence that comes from using brand-new, reliable equipment from day one.
Cost-Efficiency and Long-Term Value
The primary financial benefit is the immediate reduction in labour costs. By handling the fabrication and assembly yourself, you eliminate the significant expense of factory or workshop labour which can account for up to 30-40% of a pre-built trailer’s price tag. This saving allows you to invest in a higher grade of materials, such as heavy-duty axles and galvanised parts, building a superior asset for less initial outlay.
This approach delivers exceptional long-term value. Investing in galvanised, marine-grade components ensures your trailer resists corrosion from road salts and coastal air, a critical factor for durability in Australian conditions. It also helps you avoid the ‘hidden’ costs common with used trailers, such as worn bearings, compromised suspension, or fatigued axles that require expensive refurbishment. Starting with new parts means you have a reliable maintenance schedule from the start, not a list of potential failures.
Customisation for Specific Applications
A standard, off-the-shelf trailer rarely fits a specialised need perfectly. A kit gives you the structural freedom to build precisely what you require. You can tailor the frame dimensions for a boat, jet ski, or ATV, or design a layout purpose-built for a tradesman with specific tool and material requirements. The flexibility allows you to construct many different types of trailers from a single, reliable component base.
For instance, a cabinet maker or shopfitter requires a trailer designed to transport delicate materials and specialised tools securely. This same principle of customisation is what defines expert firms like Perfect FIT Interior, who create bespoke joinery and commercial fit-outs tailored to their clients’ specific needs.
This need for custom transport also extends to dedicated hobbyists. For example, enthusiasts who build large, portable model railway layouts for exhibitions often require custom trailers to protect their delicate work. The components for these intricate models are sourced from specialized suppliers, and a great resource for kits and accessories can be found at narrowmindedrailworks.com.
This control extends to the running gear. You can choose a specific suspension type to match its intended use:
- Leaf Spring Suspension: A durable, cost-effective choice for heavy loads and off-road travel.
- Torsion Suspension: Offers a smoother, quieter ride ideal for highway travel and protecting sensitive cargo.
Furthermore, you can integrate custom toolboxes, spare wheel mounts, or racking systems into the design from the beginning. This creates a stronger, more cohesive build compared to retrofitting accessories onto a finished trailer.
Once you’ve invested time and money into building a custom trailer for your valuable equipment, securing it against theft is the logical next step. While based in the UK, you can get ideas for modern security solutions and discover Lock and Track to see what’s possible in vehicle protection.
This security mindset should also extend to the workshop or garage where you build and store your trailer. Protecting your tools and your new asset is crucial. If you’re considering upgrading your workshop’s security, you can explore Digital Door Locks for a keyless, high-tech solution.
Similarly, professional branding can complete your custom build, turning it into a mobile advertisement for your business. For inspiration on high-quality trailer graphics and signage, you can look at the work of experienced companies like KR Graphics.
This mindset for customisation often extends beyond the trailer to the workshop or home. Once the big project is done, attention can turn to other practical upgrades. If you’re looking to improve your workspace or home with custom-fitted window coverings, you can discover Aussie Online Blinds for a wide range of Australian-made options.
Essential Mechanical Components in a Trailer Kit
The mechanical running gear is the core of any trailer build. A kit provides a pre-configured set of parts, including axles, suspension, hubs, and couplings, that form the foundation for all movement, stability, and braking. When you build your own trailer kit australia, matching these components to your trailer’s intended Aggregate Trailer Mass (ATM) is the most critical step. Every single component in the system, from the springs to the coupling, must be rated to handle the maximum load. A trailer designed for a 2,000kg ATM requires an axle set, suspension, and coupling all rated for at least 2,000kg. There are no exceptions.
These parts work in unison to ensure your trailer is safe and stable on the road. The suspension absorbs impacts, the axles bear the load, the hubs allow the wheels to spin freely, and the braking system provides controlled stopping power. Neglecting one part compromises the entire system. Understanding how to correctly specify these parts is fundamental to a successful build, and this guide to building a home-made trailer provides an excellent overview of the national standards and compliance requirements you’ll need to meet.
Axles and Suspension Systems
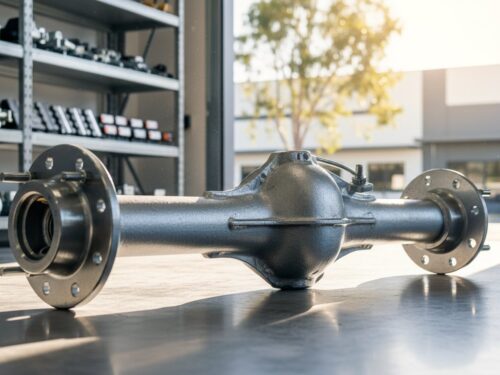
Your choice of axle profile directly impacts load distribution and ease of assembly. Square beam axles provide a flat mounting surface, which simplifies the process of welding on suspension components and ensures correct alignment. They also offer excellent resistance to bending under heavy vertical loads. Round axles remain a reliable and common choice for many lighter-duty applications. Regardless of shape, your axles are the single most critical safety component. An axle failure under load is catastrophic, so always select a product with a certified load rating that comfortably exceeds your ATM.
Suspension choice depends on your trailer’s configuration. For single-axle trailers, slipper springs are a simple, durable, and cost-effective solution. In a tandem-axle build, a rocker roller suspension set is essential. This system uses a central pivoting rocker to distribute the trailer’s weight evenly across both axles, preventing overload on a single axle when travelling over uneven terrain and providing a significantly smoother, more stable towing experience.
Braking Hardware and Couplings
Australian Design Rules (ADRs) are clear on braking. Any trailer with a Gross Trailer Mass (GTM) over 750kg must be fitted with brakes. Once the GTM exceeds 2,000kg, the law requires a breakaway system, which is typically a set of electric drum brakes powered by an on-board battery. This ensures the trailer can stop itself automatically if it detaches from the tow vehicle.
Sourcing quality parts is essential for this critical safety system. For those researching high-performance brake systems and components, you can explore options when you visit Brakes4uSG, a specialist provider for automotive enthusiasts.
To ensure this critical safety feature functions reliably, the on-board battery must be properly maintained. As part of your long-term care routine, it’s a good idea to explore Battery Testers and Chargers to keep it in optimal condition.
Your braking system dictates your coupling choice. Mechanical override couplings and parts are used for trailers between 750kg and 2,000kg GTM. They use the trailer’s forward momentum during deceleration to mechanically activate the brakes. For heavier trailers with electric brakes, a fixed coupling is used, as braking is controlled by an electronic controller in the cab. Selecting the right hub and bearing combination is the final piece. Hubs must match your wheel’s stud pattern, such as the common Ford 5-stud (PCD 114.3mm), to ensure easy sourcing of spare wheels. If you need help configuring the right parts for your build your own trailer kit australia project, our expert team can provide advice on a reliable setup.
Selecting the Right Kit Based on Payload Capacity
When you decide to build your own trailer kit australia, its load-carrying capability is the most critical factor. Choosing the correct rating ensures your trailer is safe, legal, and fit for your intended purpose. Overloading a trailer leads to premature component failure, hefty fines, and dangerous on-road incidents. Before selecting a kit, you must understand three key weight ratings.
- Tare Weight: The total weight of the empty, fully assembled trailer.
- Payload: The maximum weight of the cargo you can legally carry on the trailer.
- Aggregate Trailer Mass (ATM): The combined total of the Tare Weight and the maximum Payload. This is the trailer’s total mass when fully loaded and disconnected from the tow vehicle.
Your trailer’s final ATM must never exceed your vehicle’s maximum towing capacity. This figure is located on your vehicle’s compliance plate or in the owner’s manual. Remember to check both the vehicle’s overall capacity and the specific rating of the towbar itself, as they can differ. A 3500kg-rated vehicle is useless if it’s fitted with a 2000kg towbar. It’s also smart to future-proof your build. If your typical load is 900kg, choosing a 1300kg kit instead of a 1000kg one provides a valuable safety margin and accommodates bigger jobs down the track.
Ensuring your tow vehicle is mechanically sound is just as important as checking its towing capacity. The extra strain on the engine, transmission, and brakes can be significant, especially for European vehicles with complex systems. For our readers in the US who might be towing with such a car, getting it checked by a specialist is a wise step. For example, you can visit Euro Performance Auto Shop LLC to see the kind of expert service available for preparing a vehicle for heavy-duty use.
Single Axle Kits for Light-Duty Needs
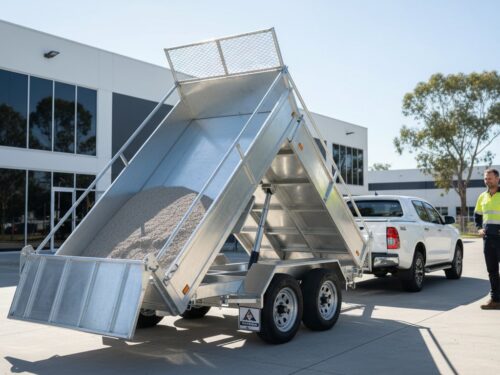
Single axle trailers are the backbone of light-duty hauling. A 750kg ATM kit is ideal for a classic 6×4 or 7×5 box trailer, perfect for tip runs, moving garden supplies, or hauling kayaks. Under Australian regulations, trailers up to 750kg Gross Trailer Mass (GTM) don’t require brakes, making these kits simple and cost-effective. For heavier loads like a trail bike, a larger boat, or light trade tools, a 1300kg or 1500kg braked kit is necessary. Once you need to carry more substantial weight or require superior durability for corrugated roads, it’s time to upgrade to a heavy-duty single axle configuration with a stronger chassis and suspension.
Tandem Axle Kits for Heavy Payloads
For serious commercial or agricultural loads, tandem axle kits are the only reliable solution. These kits are rated from 2000kg up to a 3500kg ATM, designed for car carriers, plant equipment, and large livestock trailers. Australian Design Rules mandate that any trailer with an ATM over 2000kg must be fitted with an electric brake system and a breakaway unit. The breakaway system is a crucial safety feature that automatically applies the trailer’s brakes if it detaches from the tow vehicle. The dual-axle design of tandem trailers, often using load-sharing rocker-roller suspension, provides far superior stability and tracking on highways. The load is distributed across four tyres, which drastically reduces sway and improves handling for a safer, more controlled tow.
Choosing the right axle configuration and weight rating is the foundation of a successful project. Get this right, and you’ll have a reliable trailer that serves you well for years. A proper selection makes the entire process to build your own trailer kit australia safer and more efficient.
Adhering to Australian Design Rules (ADR) for DIY Builds
Building a trailer is more than just assembling steel. It’s about meeting strict national standards to ensure safety on Australian roads. Every trailer built for road use must comply with the Australian Design Rules (ADRs). For light trailers with an Aggregate Trailer Mass (ATM) under 4.5 tonnes, the primary document you must follow is Vehicle Standards Bulletin 1 (VSB1). This bulletin outlines the minimum requirements for everything from axles to lighting. Ignoring these rules means your trailer will fail inspection and won’t be registered.
Before you begin assembly, understand that your welding and fabrication skills must meet high structural integrity standards. Poor welds are a direct safety failure. When you build your own trailer kit australia, you take on the legal responsibility of the manufacturer. This means ensuring every join is strong, every component is correctly fitted, and the finished product is roadworthy. Your work will be scrutinised during the registration inspection.
Safety Standards and Legal Compliance
Your trailer’s safety components are non-negotiable. All safety chains and D-shackles must be stamped with a rating compliant with Australian Standard AS 4177.4. Trailers with a Gross Trailer Mass (GTM) over 2.5 tonnes require two safety chains. Mudguards must be fitted to all wheels and cover the full width of the tyre tread. They must also be positioned to reduce spray to following vehicles.
Once built, your trailer needs a Vehicle Identification Number (VIN) issued by your state or territory’s transport authority. You must affix a permanent compliance plate, also known as a VIN plate, that clearly shows:
- Manufacturer’s Name (that’s you)
- Trailer Model
- Vehicle Identification Number (VIN)
- Date of Manufacture
- Aggregate Trailer Mass (ATM)
- Gross Trailer Mass (GTM)
To get your trailer registered, you’ll need to pass a formal inspection. In NSW, this is a Blue Slip inspection. In Queensland, it’s a HVRAS inspection. Other states have equivalent processes. This inspection verifies that your build strictly follows VSB1 and all relevant ADRs.
Electrical and Lighting Requirements
Correct electrical wiring is critical for safety and compliance. Australian trailers use standardised wiring colours for plugs to ensure compatibility. For a standard 7-pin flat plug, the key connections are Yellow for the left indicator, Green for the right indicator, and Red for the brake lights. All lights must be functional and correctly positioned.
LED tail lights, including brake lights and indicators, must be fitted symmetrically and be no more than 400mm from the trailer’s extreme width. The number plate must be illuminated by a dedicated white light. Additional lighting is required for larger trailers. For example, any trailer longer than 6 metres needs side marker lamps, and trailers wider than 2.2 metres must have front and rear clearance lamps. Get compliant parts you can trust. Browse our full range of ADR-approved lighting and safety chains.
Assembling Your Superior Trailer Kit
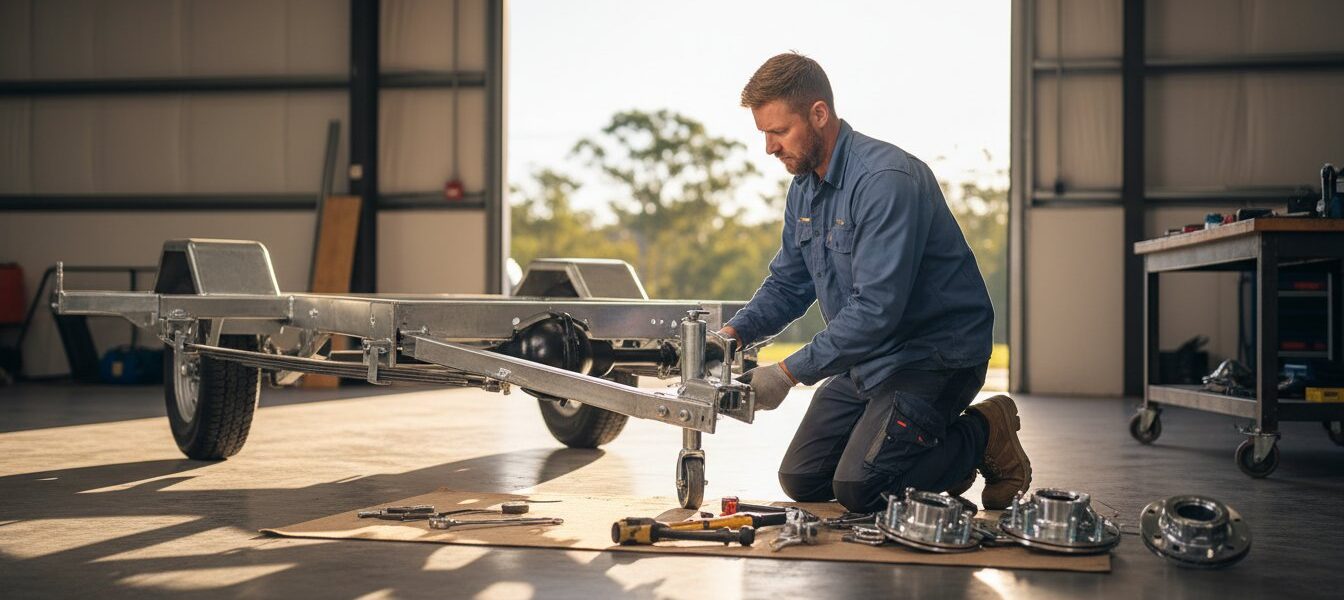
You have the components. Now it’s time for the final assembly. Precision during this stage is critical for a safe, reliable, and long-lasting trailer. Follow these steps methodically. Don’t rush the process. A well-built trailer starts with a solid foundation and correct assembly procedures.
Your first task is preparing the chassis. Work on a completely flat and level surface. Before you begin welding, ensure the frame is perfectly square. Measure diagonally from corner to corner. The two measurements must be identical. Tack weld the main joints first, then measure again. Once confirmed, you can lay the final, full-length welds. A square chassis ensures your trailer will track straight and true on the road.
With the chassis prepared, you can install the running gear. The sequence is important for accuracy.
- 1. Position and Weld Hangers: Measure the hanger locations from a fixed point, like the front of the chassis, to ensure they are parallel. Weld them securely to the frame.
- 2. Install Springs: Attach the leaf springs to the hangers. Ensure shackles move freely.
- 3. Mount the Axle: Position the axle onto the springs and secure it using the provided U-bolts. Do not fully tighten yet. Check that the axle is square to the chassis by measuring from the centre of the hub to a fixed point at the front of the frame on both sides.
Correct torque settings are non-negotiable. Once the axle is square, tighten the U-bolts in a crisscross pattern to the manufacturer’s specification, typically 80-90 Nm for a 45mm square axle. Wheel nuts for standard 1/2-inch studs should be torqued to approximately 110-120 Nm. Always use a calibrated torque wrench for this job.
If your kit includes brakes, proper setup is vital. For hydraulic systems, you must bleed the lines to remove all air pockets. Start at the caliper furthest from the master cylinder and work your way closer. For electric brakes, connect the system to your vehicle’s electric brake controller. Calibrate it according to the controller’s instructions, usually by performing a series of low-speed stops to set the right gain and power.
Perform a final safety check before hitting the road. Verify that all lights work correctly, safety chains are properly attached, the coupling locks securely onto the tow ball, and tyre pressures are set to the recommended PSI. Your initial road test should be done at low speed in a safe area. Listen for any unusual noises and test the brakes. Your project to build your own trailer kit australia is almost complete, but this final diligence ensures it’s roadworthy.
Technical Support and National Shipping
You’re never alone in the process. Our Queensland-based team provides expert advice if you hit a snag. We have the technical knowledge to guide you through any part of the assembly. If you need additional or specialised trailer parts, we ship Australia-wide to all states and territories. Use our online technical diagrams and video resources to support your build and get the job done right.
Maintenance and Long-Term Care
A trailer requires regular maintenance to perform safely. After the first 500 kilometres of travel, re-tighten all hardware, especially wheel nuts and suspension U-bolts. Routinely inspect your wheel bearings for excessive play or noise. Check suspension bushes for wear and tear. For any non-galvanised components, regularly check for signs of structural fatigue or rust and address them immediately to ensure longevity.
Start Your Trailer Build with Confidence
Building your own trailer is a practical project you can tackle. Success comes down to two key factors: selecting the right components for your payload and ensuring strict compliance with Australian Design Rules (ADR). This approach guarantees your trailer isn’t just custom-built, but also safe and road-legal. When you’re ready to find the best build your own trailer kit australia can offer, sourcing high-quality, reliable parts is the critical next step.
At Superior Trailer Parts, we supply the heavy-duty components you need. As a 100% Australian Owned and Operated company, we provide expert technical support for your project and offer nationwide shipping to any job site or workshop. Get your project moving. Browse our range of heavy-duty DIY trailer kits and find the right foundation for a reliable, long-lasting build.
Frequently Asked Questions
Do I need a license to build my own trailer in Australia?
No, you don’t need a specific trade license to build a trailer. However, your finished trailer must comply with Australian Design Rules (ADRs) and the guidelines in Vehicle Standards Bulletin 1 (VSB1). It is your responsibility to ensure the build meets all legal safety standards. The trailer must pass a compliance inspection by your state’s transport authority before it can be registered for road use.
What is the maximum weight a single axle trailer can carry?
A standard single axle trailer without brakes is legally limited to 750kg Gross Trailer Mass (GTM). If you install an effective braking system, the capacity can increase substantially. A properly braked single axle setup can be legally rated for a GTM of 1,500kg or higher. The final rating always depends on the load capacity of the axle, springs, hubs, and tyres combined.
Are electric brakes mandatory for all DIY trailer kits?
No, electric brakes are not required for every trailer. Brakes are mandatory for any trailer with a Gross Trailer Mass (GTM) over 750kg. For trailers with a GTM between 751kg and 2,000kg, you can use override brakes on at least one axle. Electric or power-assisted brakes become a legal requirement on all axles for trailers with a GTM that exceeds 2,000kg, which must also include a breakaway system.
What tools are required to assemble a trailer kit?
You will need a solid set of workshop tools for assembly. The essential equipment includes a welder (MIG is common for trailer fabrication), an angle grinder, and a power drill. A quality socket set, spanners, a tape measure, and several strong clamps are also necessary. For your safety, a welding helmet, heavy-duty gloves, and safety glasses are non-negotiable items you must have before you start.
And while you’re focused on project safety, don’t neglect your personal health. The intense concentration involved in fabrication can lead to issues like jaw clenching or teeth grinding. If you’re in Sydney and find yourself dealing with dental pain after long hours in the workshop, consider getting a check-up from a professional team like Midway Dental Clinic.
Can I use second-hand wheels on a new trailer kit?
Yes, but you must perform a thorough inspection first. The wheels and tyres must have a load rating that is equal to or greater than your trailer’s Aggregate Trailer Mass (ATM). Carefully check the rims for any cracks, rust, or damage. The tyres must have legal tread depth and show no signs of perishing or sidewall damage. Using parts with an unknown history or an inadequate load rating is a major safety risk.
How do I get a VIN for a home-built trailer?
You must apply for a Vehicle Identification Number (VIN) directly from your state or territory’s transport authority, such as VicRoads or Transport for NSW. This application needs to be completed and approved before you take the trailer for its first registration inspection. You will be issued a 17-digit VIN, which you must then permanently stamp or affix to a compliance plate on the trailer’s chassis.
Is it cheaper to build a trailer or buy one?
It can be cheaper to build a trailer if you already own the necessary tools and have the skills. The primary saving is on factory labour costs. Opting for a build your own trailer kit australia provides an excellent balance of value and convenience. It is more affordable than a pre-built trailer and eliminates the hassle of sourcing individual parts, ensuring every component is brand new, rated correctly, and compliant with national standards.
What is the difference between slipper and rocker roller springs?
Slipper springs are a simple and economical suspension type for light-duty, single axle trailers, generally used for loads up to 1,500kg. Rocker roller springs are a heavy-duty suspension system designed for tandem axle trailers. They feature a central pivoting rocker that distributes the load between the two axles. This design provides a smoother ride and superior performance on uneven ground, making it the standard for trailers over 2,000kg GTM.