You’re 200 kilometres into a haul across the Hay Plain when your in-car controller begins flashing a fault code and your brakes start grabbing unevenly. This isn’t just a minor inconvenience; it’s a critical safety risk that demands immediate attention. Effective troubleshooting electric trailer brakes requires a systematic approach rather than guesswork. You know that a reliable braking system is the difference between a controlled stop and a dangerous jackknife on the highway.
We understand that your time is valuable and your equipment needs to work every time. This diagnostic guide provides a professional, step-by-step framework to identify and fix electrical and mechanical faults in your trailer’s braking system. We’ll show you how to test magnets, check heavy-duty wiring, and verify that your setup meets Australian safety standards. This systematic approach ensures you get back on the road with total confidence in your trailer’s performance.
Key Takeaways
- Apply the ‘Divide and Conquer’ rule at the plug to isolate faults between your tow vehicle and trailer wiring quickly.
- Master the use of a multimeter for troubleshooting electric trailer brakes by identifying high-resistance earth connections and testing DC voltage.
- Identify when mechanical wear or contamination requires drum removal and component replacement rather than electrical adjustment.
- Test the functionality of your brake controller and breakaway switch to ensure compliance with Australian safety standards for heavy trailers.
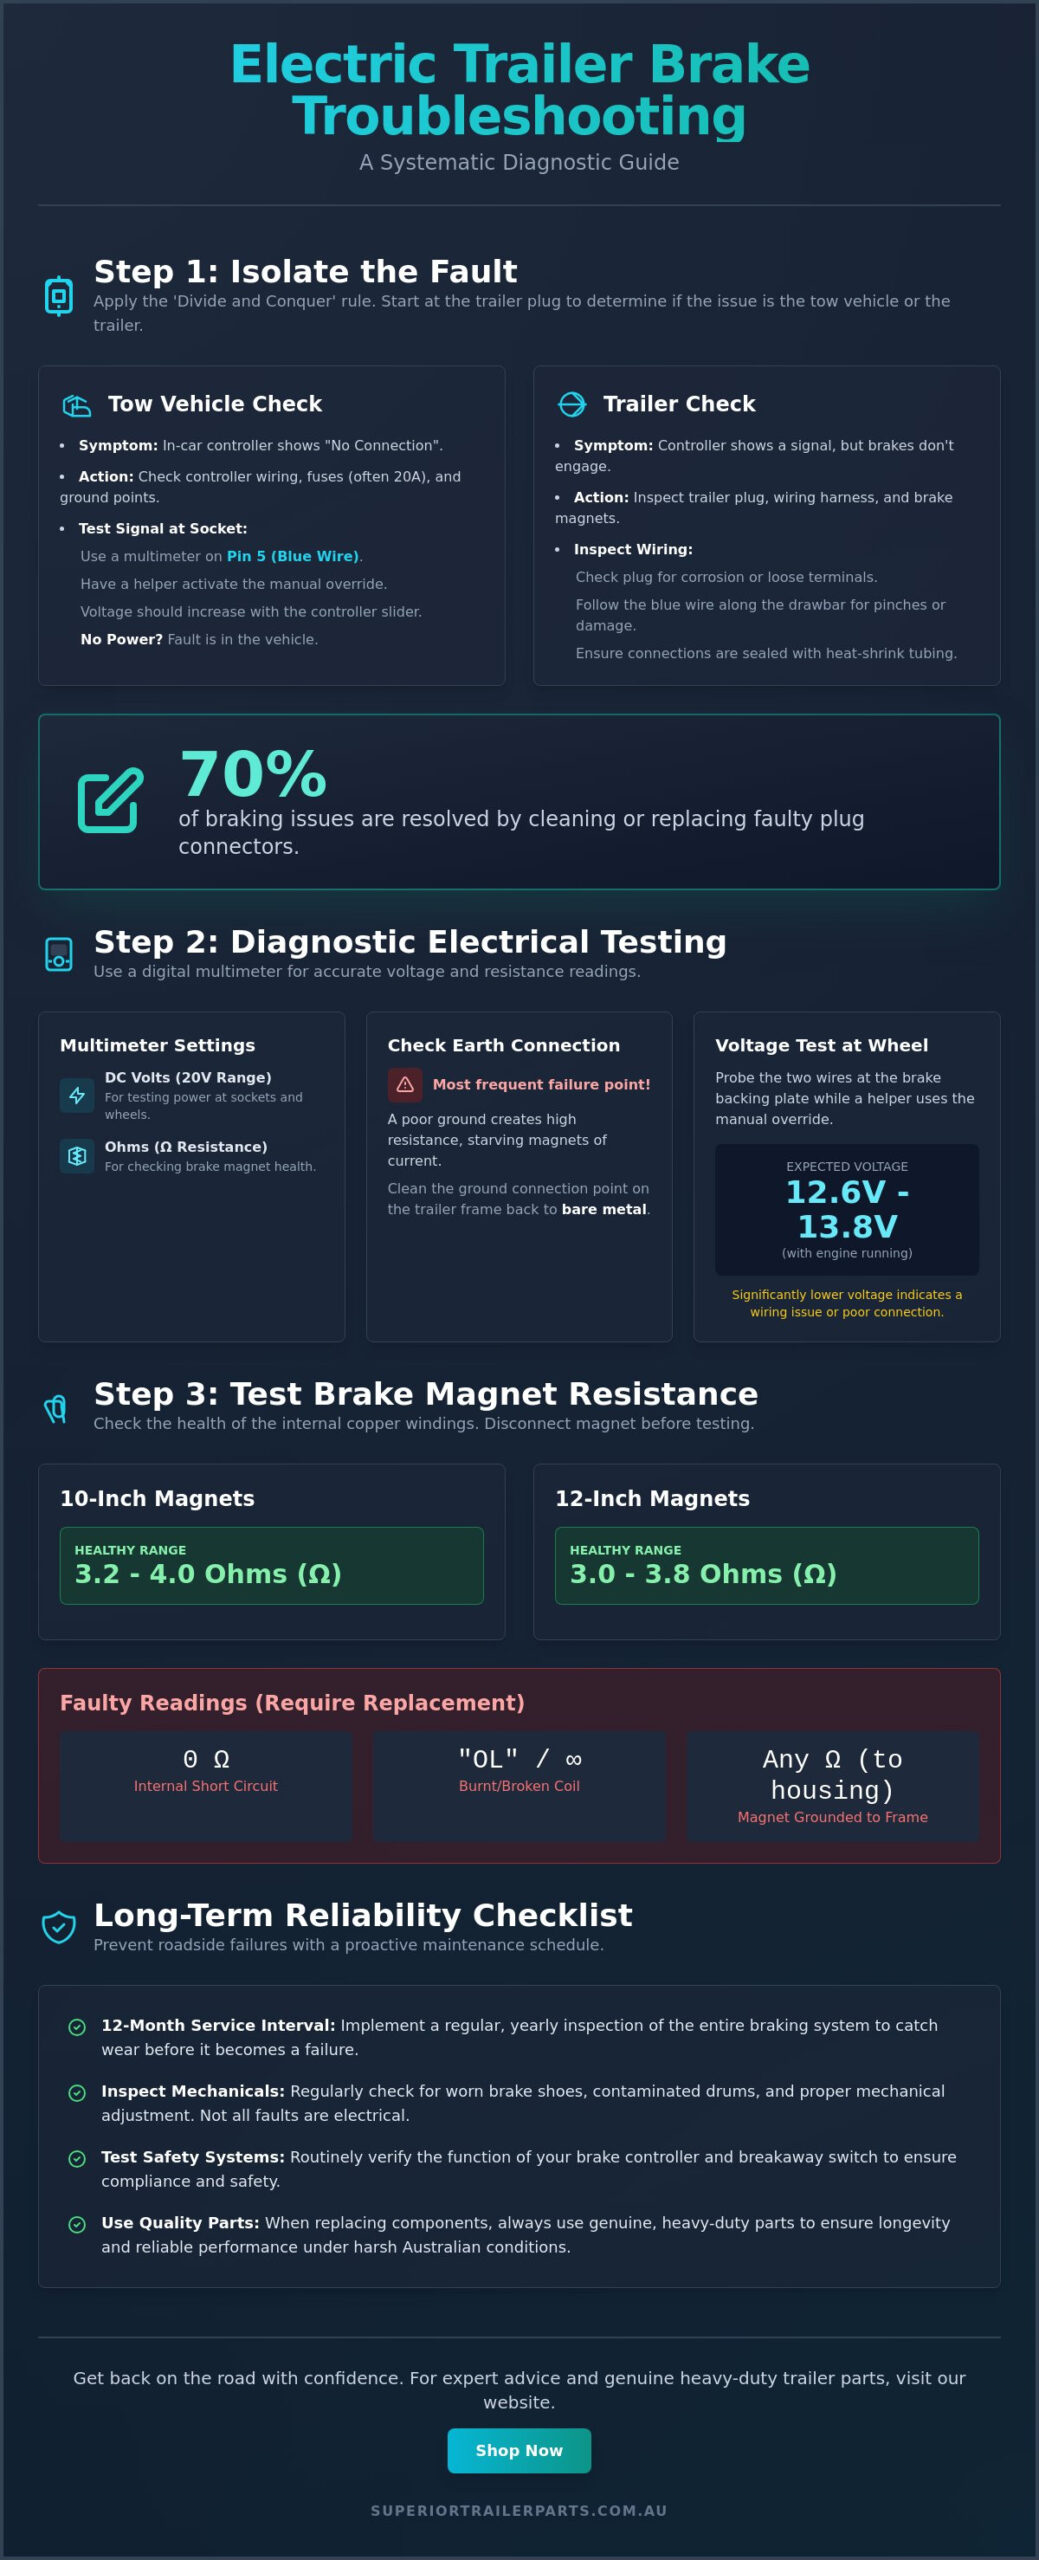
- Implement a 12-month service interval using genuine heavy-duty parts to maintain system reliability and prevent costly roadside failures.
Isolating the Fault: Tow Vehicle vs. Trailer
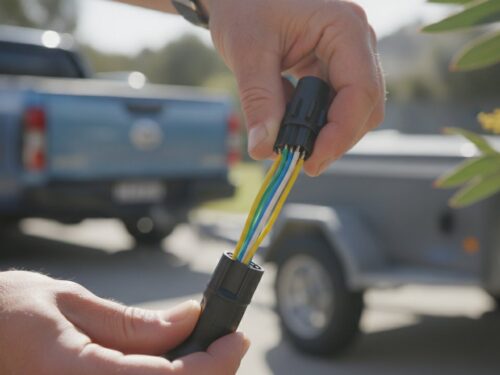
Effective troubleshooting electric trailer brakes begins with the ‘Divide and Conquer’ rule. You must determine whether the fault lies with the tow vehicle or the trailer before dismantling any mechanical components. Start at the trailer plug. This simple step prevents hours of unnecessary work on functional parts. If the brakes fail to engage, the first priority is verifying that the vehicle is actually sending a signal to the trailer.
Common symptoms help narrow the search. If your in-car controller displays a ‘No Connection’ message, the issue usually sits between the dashboard and the trailer plug. Conversely, if the controller shows a signal but the brakes remain unresponsive, the fault likely resides in the trailer wiring or the Electric friction brake magnets. Using a second vehicle with a known working brake controller is the fastest diagnostic method. If the trailer works with a different car, your vehicle is the problem. Recent industry data suggests that 70% of reported braking issues are resolved simply by cleaning or replacing the plug connectors.
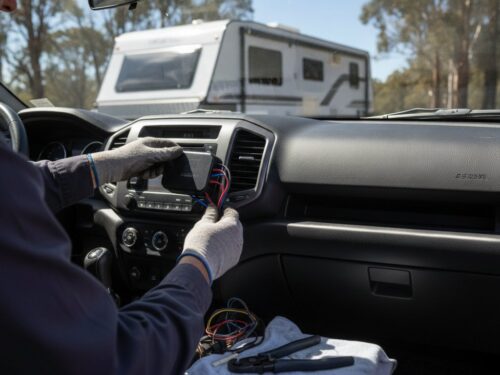
Verifying the Tow Vehicle Signal
Use a 12V circuit tester or a multimeter on Pin 5 of the vehicle’s 7-pin or 12-pin socket. In the Australian standard wiring loom, Pin 5 is the dedicated blue wire for electric brakes. Have an assistant sit in the cab and press the manual override on the brake controller. You should see a consistent voltage reading that increases as the manual slider is moved. If there’s no power at Pin 5, check the vehicle’s brake controller fuses and ground points. A faulty in-car controller often results from a loose connection behind the dash or a blown 20A fuse in the engine bay.
Checking the Trailer Plug and Drawbar Wiring
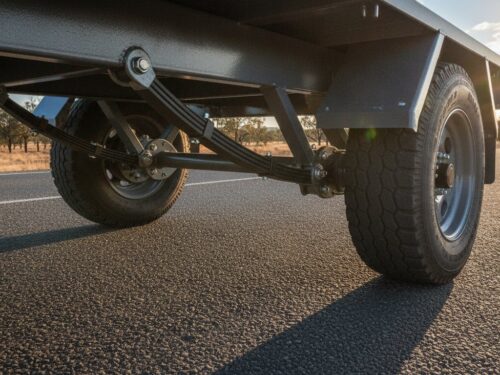
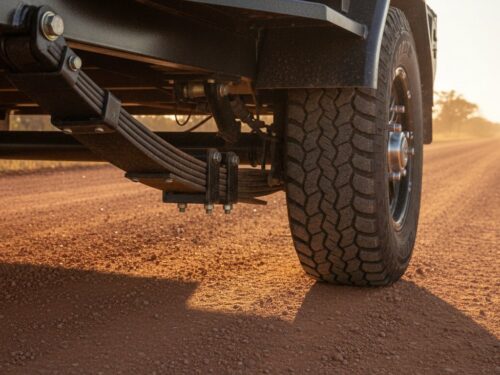
The trailer plug is the most frequent failure point due to its exposure to road grime and moisture. Open the plug housing to inspect for green corrosion or loose terminals. A single loose strand of wire can cause intermittent braking or a complete short circuit. Follow the blue wire along the drawbar and A-frame. Look for pinched sections where the cable might’ve been crushed during tight turns or caught in the jockey wheel bracket. For those replacing damaged components, sourcing high-quality trailer parts ensures the longevity of your repair. Ensure all connections on the A-frame are sealed with heat-shrink tubing to withstand harsh Australian conditions. Troubleshooting electric trailer brakes requires this level of physical inspection to catch frayed insulation before it causes a total system failure.
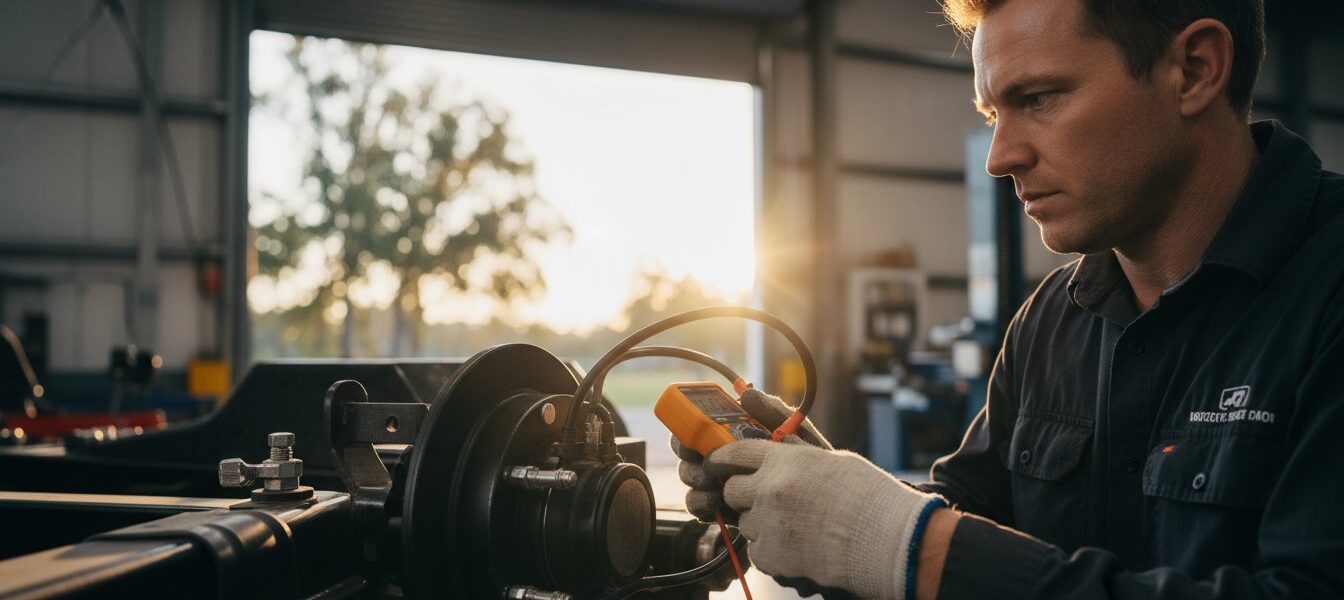
Diagnostic Electrical Testing with a Multimeter
Effective troubleshooting electric trailer brakes starts with a reliable digital multimeter. You must set your device correctly to get accurate data. For power tests, set the dial to DC Volts, usually the 20V range. When checking the health of the magnets themselves, switch the setting to Ohms (Resistance). Accuracy is vital because a variation of just one or two volts can be the difference between safe stopping and a dangerous trailer sway.
The earth connection is the most frequent source of electrical failure in Australian trailers. A poor ground creates high resistance, which starves the magnets of the current they need to function. Don’t just look at the wires; use your multimeter to check continuity between the trailer frame and the white ground wire at the plug. If you find rust, paint, or corrosion at the connection point, clean it back to bare metal. Most “gremlins” disappear once you establish a solid, clean earth.
To measure voltage at the wheel, you need a second person to operate the manual override on the brake controller. Probe the two wires leading into the brake backing plate. You should see a reading close to the battery voltage of the tow vehicle, typically 12.6V to 13.8V when the engine is running. If you find significantly lower numbers, you are dealing with a wiring bottleneck.
Testing Magnet Resistance (Ohms)
Testing resistance tells you if the copper windings inside the magnet are still intact. Resistance is the measure of how much an electrical component opposes the flow of current within the brake circuit. To test this, disconnect the magnet from the main trailer harness to avoid interference from other parts of the system. Use these standard values for reference:
- 10-inch Magnets: 3.2 to 4.0 Ohms.
- 12-inch Magnets: 3.0 to 3.8 Ohms.
If your reading is 0 Ohms, the magnet has an internal short. If the multimeter shows “OL” or infinite resistance, the internal coil is burnt out and broken. You must also check for a “grounded” magnet by placing one probe on a magnet lead and the other on the metal housing of the magnet. Any reading other than infinite means the magnet is shorting to the trailer frame and needs immediate replacement.
Voltage Drop Analysis
Voltage drop is a common issue on long trailers or tandem axle setups. You might measure 12V at the trailer plug but find only 8V at the rear magnets. This 4V loss happens because the electrical current meets resistance in the wiring. Using thin 2mm automotive wire over a 6-metre trailer length is a mistake that leads to weak braking. Heavy-duty 4mm or 5mm wire is required to maintain performance.
Check your junction boxes for signs of “green death” or copper corrosion. Corroded terminals act like a resistor, heat up, and sap power before it reaches the wheels. If your testing reveals consistent power loss across the system, it might be time to source high-quality replacement trailer parts to restore your braking force. Ensure all joins are soldered and sealed with heat-shrink tubing to withstand harsh Australian road conditions.
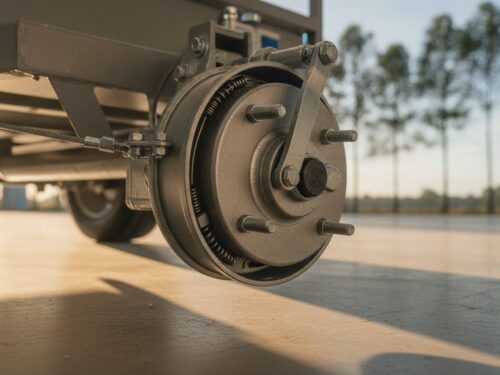
Inspecting the Mechanical Brake Assembly
Electrical tests verify the signal, but the mechanical components do the physical work of stopping your load. Troubleshooting electric trailer brakes requires a hands-on inspection of the drum internals. A perfect electrical circuit cannot compensate for worn friction material or grease-soaked components. If your controller shows a connection but braking performance is weak, the issue usually lies behind the hub.
Follow these steps to access the brake assembly safely:
- Park the trailer on a level surface and chock the wheels.
- Jack up the axle and secure it with heavy-duty jack stands.
- Remove the wheel, dust cap, and the split pin from the spindle.
- Unscrew the spindle nut and remove the outer bearing.
- Slide the drum off the axle spindle carefully.
Keep a clean rag handy to catch the outer bearing so it doesn’t fall into the dirt. Once the drum is off, you have a clear view of the magnet, shoes, and hardware.
The Magnet and Armature Surface
The magnet must make flat, uniform contact with the armature surface on the inside of the drum. Inspect the magnet face for “pitting” or uneven grooves. If the copper coil is visible through the friction material, the magnet is spent and needs replacement. Check the magnet lever arm for excessive play at the pivot point. A worn arm prevents the magnet from swinging out correctly, which stops the shoes from expanding. Clean the armature surface with a dedicated brake cleaner. If the metal is heavily scored, the drum requires machining or replacement to ensure a reliable friction surface.
Brake Shoe and Spring Condition
Examine the brake shoes for wear. Australian safety standards generally dictate a minimum friction material thickness of 1.5mm. Anything less increases the risk of metal-on-metal contact and drum damage. Look for signs of “glazing,” where the shoe surface appears shiny and glass-like. This happens when brakes overheat, significantly reducing their stopping power.
Check for grease contamination on the linings. If the rear seal has failed, grease will coat the shoes and magnet, making the brakes slide rather than grip. Contaminated shoes cannot be cleaned effectively and must be replaced with fresh trailer parts to restore safety. Finally, inspect the return springs. Broken or stretched springs fail to pull the shoes back after braking. This causes constant drag, which generates extreme heat and can lead to bearing failure on long hauls.
Troubleshooting the Brake Controller and Breakaway System
The brake controller acts as the brain of your towing setup. Troubleshooting electric trailer brakes requires a solid understanding of how this unit communicates with the drums. Most modern setups use proportional controllers. These units feature an internal accelerometer to match the trailer’s braking force with the tow vehicle’s deceleration. Older time-delay controllers simply ramp up power over a pre-set interval regardless of how hard you hit the pedal. This lack of precision often leads to jerky stops or overheated magnets.
Digital controllers provide immediate feedback through error codes. An “NC” or “No Connection” code usually points to a faulty 7-pin or 12-pin plug. An “SC” code indicates a short circuit in the blue brake output wire. If your unit displays a “Low Battery” warning, check the vehicle’s alternator output or the dedicated power feed from the battery. These units require a clean 12V signal to operate the magnets effectively. A weak ground is the most common cause of intermittent controller errors.
Adjusting the Brake Controller Gain
Setting the “Gain” ensures the trailer provides enough stopping power without locking the wheels. Find a flat, quiet road and drive at 40 km/h. Increase the gain until the trailer brakes lock when you apply the manual override. Back the setting off just enough to stop the skidding. If the trailer feels like it’s pushing the vehicle, the gain is too low. If the controller stays “ON” constantly, the internal sensor has failed or the unit is mounted at an angle exceeding the manufacturer’s specifications. Most controllers must be mounted level within a 20-degree range to function correctly.
The Breakaway Switch Test
Australian Design Rules mandate breakaway systems for all trailers with a GTM over 2,000kg. This system is a critical safety fail-safe. To test it, perform a “Pull-Pin” test while the trailer is stationary and disconnected from the vehicle. Pull the pin from the switch. The trailer brakes should lock instantly. You should not be able to move the trailer by hand or with a small amount of vehicle force. Replace the pin immediately after the test to prevent draining the battery.
- Battery Health: Use a multimeter to check the breakaway battery. It must maintain at least 12.6V. A reading below 12.0V under load indicates a dead cell.
- Charging Circuit: Ensure the tow vehicle is charging the breakaway battery through the auxiliary pin. Check this with the engine running.
- Cable Condition: Sun-damaged or brittle nylon cables will snap during an emergency. Replace any frayed or cracked pull-cables to ensure they can actually pull the pin if the trailer uncouples.
For high-quality replacements and reliable components, browse our full range of heavy-duty trailer parts to keep your rig compliant and safe on Australian roads.
Maintaining Your Braking System for Long-Term Reliability
Choosing High-Quality Replacement Parts
The difference between standard and premium 10-inch electric drum brakes is significant. Standard units often use thinner friction material that wears down quickly under heavy loads. Premium versions feature high-temperature linings and reinforced backing plates. Australian conditions are notoriously harsh, especially on unsealed tracks where dust and vibration destroy inferior components. Using genuine heavy-duty parts prevents roadside failures that can leave you stranded in remote areas.
Heavy-duty magnets are a vital investment for any long-distance hauler. These magnets feature thicker wear indicators and reinforced lead wires to handle constant corrugations. For those towing boat trailers, saltwater is the primary enemy. Bare steel components can seize within 6 months of exposure. Always opt for high-quality galvanised parts to ensure the assembly remains functional after repeated submersions. You can find a wide range of reliable trailer brakes and calipers designed to withstand these local environments. Quality parts provide the durability needed for long-term peace of mind.
Final Safety Checklist Before Your Next Trip
Perform a quick diagnostic check before every departure to ensure your system is operational. This simple routine can prevent a major incident on the highway. Follow these steps for a reliable setup:
- Turn the vehicle ignition on and have a partner stand near the trailer wheels.
- Press the manual override on your brake controller inside the cab.
- Listen for a distinct electrical ‘hum’ from each hub, which confirms the magnets are energising.
- Conduct a short 5km test drive at moderate speeds.
- Pull over and carefully feel each wheel hub. They should be warm to the touch.
- Identify any cold hubs, which indicate a lack of braking, or scorching hot hubs, which suggest a dragging shoe.
Don’t ignore uneven heat across your axles. If one side is significantly hotter than the other, your brakes require immediate adjustment or cleaning. Troubleshooting electric trailer brakes is easier when you catch these symptoms early. If you’re unsure about your specific setup or need technical specifications, contact us for expert advice. We are Australian owned and operated, providing the technical support you need to keep your trailer moving safely.
Restore Your Braking Performance Today
Effective troubleshooting electric trailer brakes requires a disciplined approach to both electrical and mechanical components. Start by isolating the fault to either the tow vehicle or the trailer. This single step eliminates 50 percent of potential variables immediately. Use a multimeter to verify 12V output at the plug and check for ground continuity. If the electrical circuit holds up, pull the drums to inspect for magnet wear or grease contamination on the shoes. Maintaining these systems ensures your setup remains compliant with ADR 38/05 regulations and performs when you hit the anchors. Safe towing isn’t about luck; it’s about reliable hardware and regular maintenance.
Superior Trailer Parts provides the heavy-duty gear you need to finish the repair. We’re an Australian Owned and Operated business committed to keeping your fleet moving. Our team offers expert advice on ADR compliance to ensure your trailer stays road legal and safe. We provide nationwide shipping on all brake parts to get your vehicle back in service fast. Don’t let a faulty brake system sideline your next haul.
Browse our range of heavy-duty electric brake components and get your trailer back in top condition.
Frequently Asked Questions
Is it normal for electric trailer brakes to make a humming sound?
A faint humming sound is normal when the brake controller is active and the vehicle is stationary. This noise confirms that the electromagnets are receiving power and are ready to engage the drum. If the sound is excessively loud or persists when the brakes aren’t applied, check for a short circuit or a sticking controller override. High-quality heavy-duty magnets often produce a consistent hum that indicates a healthy electrical connection.
Can I test my trailer brakes without a multimeter?
You can test your brakes without a multimeter by using a magnetic compass or listening for a physical click. Hold the compass near the wheel hub while an assistant applies the manual override on the brake controller. The compass needle will spin or deflect if the magnet is energised. Alternatively, jack up the trailer and spin the wheel by hand while the brakes are applied to check for immediate resistance.
How much voltage should be going to my electric trailer brakes?
A functional 12V system should deliver approximately 12 to 13 volts at the trailer plug when the controller is set to maximum gain. When troubleshooting electric trailer brakes, expect to see lower voltage at the magnets depending on your specific controller settings and wire length. Check for voltage drops greater than 1 volt between the tow vehicle battery and the rear magnets to identify poor connections or thin gauge wiring.
What happens if the blue wire on my trailer plug is disconnected?
A disconnected blue wire results in a total loss of trailer braking power. The blue wire is the dedicated output line that carries the electrical signal from the controller to the trailer magnets. If this connection fails, your trailer will rely entirely on the tow vehicle’s braking system. This can increase stopping distances by up to 40 percent on heavily loaded trailers, creating a significant safety risk on Australian roads.
Why do my trailer brakes feel jerky or pulsing when I slow down?
Jerky or pulsing brakes usually indicate out-of-round brake drums or improper shoe adjustment. If the drum is warped by more than 0.5mm, the magnets won’t grip the armature plate consistently. This creates a surging sensation during deceleration. Clean the assembly with a wire brush and ensure the shoes are adjusted so they just touch the drum surface. Reliable braking requires a perfectly flat friction surface on the drum.
Can a bad ground wire cause my brakes to lock up?
A bad ground wire typically causes weak or intermittent braking rather than an immediate lockup. However, a loose ground can cause the controller to pulse power erratically, which might lead to unpredictable wheel locking in some digital controllers. Ensure the white ground wire is secured to a clean, unpainted section of the trailer frame. A solid ground is essential for maintaining the constant 12V circuit required for smooth operation.
How often should I replace the magnets in my electric brakes?
Replace your brake magnets when the wear indicator pips are no longer visible or if the surface shows uneven scoring. Most heavy-duty magnets last between 30,000 and 50,000 kilometres depending on your typical load weight and driving conditions. Inspect the magnets every 10,000 kilometres to ensure the friction surface remains flat. Genuine replacement parts ensure the magnet maintains the correct pull force against the armature plate.
Is it safe to drive if my brake controller shows an ‘OL’ or ‘Short’ error?
It’s not safe to drive with an ‘OL’ or ‘Short’ error displayed on your brake controller. These codes indicate a direct electrical fault that can disable your trailer brakes entirely. Pull over immediately and inspect the wiring for frayed insulation or a pinched blue wire. Driving with these faults risks damaging your vehicle’s electrical system and losing control during emergency braking maneuvers.