A 12-pin plug is not just a larger connector. It is a dual-purpose interface that requires a specific wiring strategy for both lighting and high-current power. Many drivers find the transition from 7-pin to 12-pin systems confusing, especially when faced with conflicting colour codes for the additional five pins. You may have already dealt with flickering lights or a dead caravan battery because the wiring failed to meet the necessary load requirements. Mastering the 12 pin flat plug wiring diagram australia is the only way to ensure your setup remains legal, safe, and functional on the road.
We understand that reliability depends on precision. You will learn how to configure your plug to power everything from LED tail lights to electric brakes and fridges without experiencing significant voltage drop. This technical breakdown covers the AS 4177.5-2004 standards and explains why pins 8 through 12 require 6mm auto cable for heavy-duty applications. We provide the exact specifications you need to achieve a professional, durable installation that stands up to harsh Australian conditions.
Key Takeaways
- Identify the two-tier design of the 12-pin plug to separate standard lighting from high-current auxiliary power. This ensures your setup meets the AS 4177.5-2004 standard.
- Follow the 12 pin flat plug wiring diagram australia to map pins 1 through 12 accurately. Correct mapping prevents common issues like dead batteries and flickering lights.
- Select the correct wire gauge for pins 8 through 12 to handle high-amperage demands. Using 6mm auto cable is necessary to power fridges and ESC without dangerous voltage drop.
- Implement a regular terminal cleaning routine to stop high-resistance heat buildup. Solid connections protect your electrical system from failure and ensure long-term durability.
Understanding the 12 Pin Flat Plug Standard in Australia
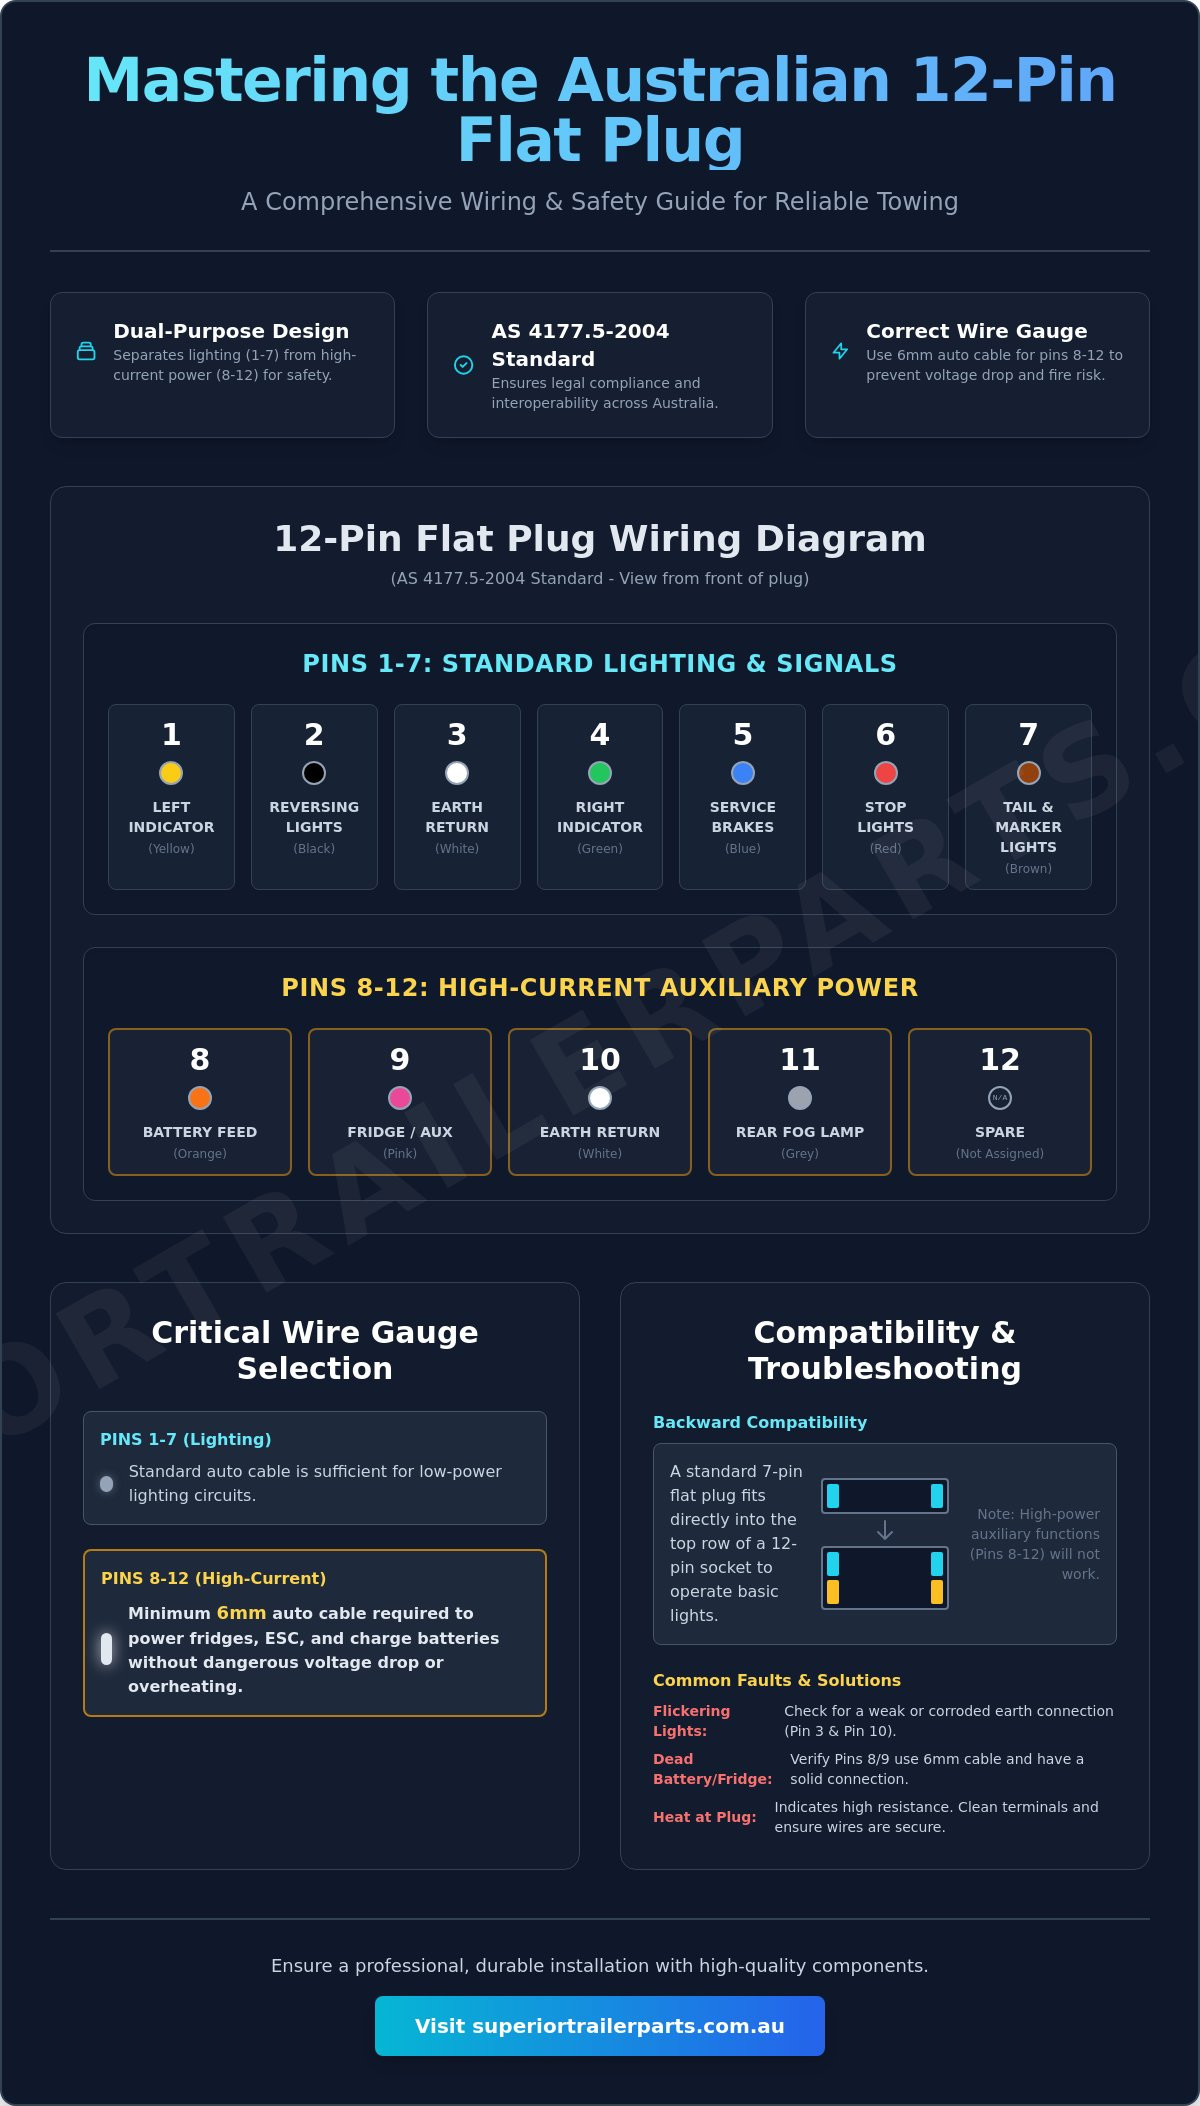
The 12-pin flat plug is the primary standard for modern caravans and heavy trailers across Australia. It uses a unique two-tier design to manage both basic lighting and high-current auxiliary power. The top row contains seven pins dedicated to standard signals like indicators, tail lights, and brake lights. The bottom row introduces five larger pins specifically for heavy-duty functions. This configuration allows you to power internal fridges, Electronic Stability Control (ESC), and complex battery charging systems through one interface. Referencing a reliable 12 pin flat plug wiring diagram australia ensures that your tow vehicle and trailer communicate correctly without overloading thin-gauge circuits.
Why Australia Uses the 12 Pin Flat Configuration
Caravan power demands have increased as off-grid technology improves. Standard 7-pin plugs simply don’t have the capacity to safely carry the high amperage required for modern appliances. The 12-pin system evolved to solve this problem while maintaining compliance with Australian trailer connector standards and Australian Design Rules (ADR). This setup provides a professional solution that prevents the clutter of multiple plugs. By using a 12-pin connector, you can often eliminate the need for a separate Anderson plug for lower-amperage accessories. You get a streamlined, sturdier connection that supports critical safety features like ESC and keeps your caravan batteries charged while you drive.
Backward Compatibility and Interoperability
Physical compatibility is a key strength of the 12-pin socket design. A standard 7-pin flat plug fits directly into the top row of a 12-pin flat socket. The spacing and pin dimensions for these first seven pins remain identical across both systems. This means you can tow a standard box trailer with a vehicle wired for a 12-pin caravan setup without any modifications. There are clear limitations to this interoperability. A 7-pin plug only activates the basic lighting circuits. It cannot reach the auxiliary power terminals on the bottom row. If your trailer needs power for a fridge or a breakaway battery, a 7-pin plug will not work. Some users prefer a trailer plug adapter for occasional use. For those towing heavy caravans regularly, a permanent 12-pin installation offers the best performance and durability. You can find high-quality electrical components and caravan parts to ensure your connection remains secure under harsh towing conditions.
12 Pin Flat Plug Wiring Diagram and Colour Codes
Accuracy in your wiring prevents electrical faults and ensures compliance with Australian road laws. The 12-pin flat plug follows a rigid colour-coded sequence specified by the AS4177.5-2004 standard. This allows any vehicle to connect to any trailer without damaging the electrical system. Using a professional Narva 12-pin wiring diagram as a reference is the best way to ensure every wire lands on the correct terminal. This consistency’s vital for fleet managers and solo travellers alike. It’ll guarantee that a replacement plug installed in Perth will work perfectly with a trailer wired in Brisbane.
Pins 1-7: The Lighting and Signal Circuit
The top row of the plug handles your essential road signals. These pins follow the same configuration as a standard 7-pin flat plug.
- Pin 1: Yellow (Left indicator)
- Pin 2: Black (Reversing lights or auxiliary)
- Pin 3: White (Earth return)
- Pin 4: Green (Right indicator)
- Pin 5: Blue (Service brakes)
- Pin 6: Red (Stop lights)
- Pin 7: Brown (Tail, clearance, and side marker lights)
Pay close attention to Pin 3. A weak earth connection’s the most common cause of flickering caravan parts like LED tail lights. Ensure this wire’s secured to a clean, metal-to-metal contact point. For Pin 6, use a high-quality connection to ensure your stop lights provide maximum visibility the moment you hit the pedal.
Pins 8-12: The Auxiliary and High-Current Circuit
The bottom row features five larger pins. These are designed to carry higher amperage than the standard lighting pins.
- Pin 8: Orange (Battery feed)
- Pin 9: Pink (Auxiliary/Fridge)
- Pin 10: White (Earth return for pins 8-12)
- Pin 11: Grey (Rear fog lights or spare)
- Pin 12: Light Blue (Auxiliary/ESC)
Pin 10 acts as the dedicated earth for these high-current circuits. It requires a larger wire gauge to match the combined load of pins 8, 9, and 12. If you use thin wire for this earth, you’ll risk overheating the terminal or causing a significant voltage drop. Pin 12’s frequently used for Electronic Stability Control (ESC) systems on modern caravans. This separation of lighting and auxiliary power allows you to charge batteries or run a fridge without dimming your signals. Following the 12 pin flat plug wiring diagram australia correctly ensures that your high-draw accessories receive the current they need for reliable performance.
Powering Caravans: Deep Dive into Pins 8 to 12
Voltage drop is the most frequent cause of appliance failure in caravans. When you run long lengths of cable from the vehicle battery to the trailer plug, the resistance increases. If you use undersized wire, your fridge might receive only 10.5V instead of the required 12.6V. This results in poor cooling and potential compressor damage. Pin 10 is the most critical connection in this row because it acts as the common earth for all auxiliary circuits. It must be wired with a heavy-gauge cable, typically 6mm auto cable, to handle the combined return current from the other four auxiliary pins. A weak earth at Pin 10 is a recipe for melted plastic and electrical shorts.
Running 12V Fridges and Battery Charging
Allocating pins 8 and 9 correctly prevents roadside headaches. Pin 8 typically provides a constant battery feed, while Pin 9 is often reserved for ignition-switched power. This configuration ensures your fridge runs while you’re driving but won’t drain your starter battery during a lunch break. While a 12-pin plug can handle moderate auxiliary loads, very high-current applications often require supplementary solutions. For heavy battery charging, the current trend in Australia is to use an Anderson plug with 8 B&S cable alongside the 12-pin connector. This ensures your caravan parts receive the maximum possible current without overheating the plug terminals.
Electronic Stability Control (ESC) Wiring
Modern safety systems like AL-KO and Dexter ESC rely on the 12-pin interface for their power supply. Pin 12 is the standard choice for these Electronic Stability Control units. These systems are safety-critical and require a clean, high-amperage signal to function during an emergency sway event. Don’t compromise on wire quality for this circuit. Use a dedicated 6mm cable to ensure the ESC unit has enough power to apply the trailer brakes instantly when needed. Always check the status light on your ESC unit every time you hitch up to confirm the connection is active and secure.
Step-by-Step Installation and Wire Gauge Selection
Achieving a reliable connection starts with the right hardware. You can’t rely on standard 7-core cable for a 12-pin setup because it won’t handle the auxiliary load. A professional installation requires a high-quality wire stripper, a soldering iron for tinning, and a set of precision screwdrivers. Tinning the wire ends is a critical step. It prevents individual copper strands from fraying or oxidizing inside the terminal. This practice ensures your 12 pin flat plug wiring diagram australia remains accurate and functional even after years of exposure to coastal salt or outback dust.
Sealing the plug is just as important as the wiring itself. Use a plug with an integrated rubber gland or apply a small amount of neutral-cure silicone where the cable enters the housing. This prevents moisture from wicking up the wires and causing internal corrosion. In Australian conditions, heat and vibration are your primary enemies. Secure all cables with UV-stabilized cable ties to prevent the weight of the harness from pulling on the terminals while you’re driving on corrugated roads.
Choosing the Correct Cable and Wire Gauge
Standard 7-core trailer cable usually features 1.5mm² to 2.5mm² wire. This is sufficient for pins 1 through 7, which carry low-current signals for LED tail lights and indicators. However, pins 8 through 12 demand much higher capacity. For these auxiliary circuits, you must use a minimum of 6mm auto cable. This gauge is roughly equivalent to 4.5mm² or 10-11 B&S. It provides the necessary amperage capacity to run a 12V fridge or charge a caravan battery without dangerous overheating. Always calculate your total load before starting. If your setup includes high-draw accessories, undersized wiring will lead to a significant voltage drop and poor appliance performance.
The Wiring Process: Best Practices
Follow a logical sequence to avoid mistakes. Disassemble the plug and slide the outer housing and cable gland onto the wire before you begin stripping. It’s a simple step that’s often forgotten.
- Step 1: Prepare the cable by stripping 10mm of insulation from each core and tinning the tips with solder.
- Step 2: Terminate the earth wires first. Connect the main earth to Pin 3 and the high-current auxiliary earth to Pin 10. These establish the circuit base.
- Step 3: Follow your 12 pin flat plug wiring diagram australia to connect the remaining signal and power wires to their designated terminals.
- Step 4: Tighten the cable grip and gland. Use a multimeter to test for continuity and ensure there are no short circuits between adjacent pins.
Testing your work before hitting the road prevents blown fuses and equipment damage. If you need high-quality electrical components or replacement connectors, browse our full range of trailer parts to ensure your rig is built for the long haul.
Maintaining Reliable Connections and Troubleshooting
A 12-pin plug works hard. It faces grit, moisture, and constant vibration every time you hit the road. Regular inspections prevent roadside failures and expensive repairs. Look for dimming lights or melted plastic around the pins. These are clear signs of high resistance. If your trailer battery doesn’t charge while driving, the connection is likely compromised. Use a 12 pin flat plug wiring diagram australia to trace faults back to specific terminals and identify which circuit is failing.
Heat destroys high-current circuits. Clean your terminals every few months to maintain performance. Use a dedicated contact cleaner and a small brass brush. This removes oxidation that creates electrical resistance. Check for “pin spread” in the socket. This happens when female terminals loosen over time. Use a small flat-head screwdriver to gently tension the pins for a tighter fit. A secure connection ensures maximum surface contact. It stops arcing and prevents the plug from vibrating loose on corrugated tracks.
Intermittent lighting or ESC errors usually come from poor earthing. Pin 3 and Pin 10 are your ground returns. If these are loose or corroded, the entire system becomes unstable. Test earth points with a multimeter. A reading higher than 0.2 ohms indicates a problem. Fix it immediately to prevent damage to your caravan’s sensitive electronics. Proper earthing is the foundation of a reliable electrical setup.
Common Wiring Failures and Fixes
Corrosion is a major issue in coastal areas. Use dielectric grease on terminals after cleaning. This seals out moisture and salt air. Check the wiring behind the plug housing regularly. Vibration fatigues copper and breaks strands over time. If you buy a second-hand trailer, verify the wiring yourself. Mismatched car and trailer wiring can blow fuses or damage ESC units. Always check the harness against the standard 12 pin flat plug wiring diagram australia before your first trip with a new rig.
Superior Trailer Parts Solutions
Reliability depends on the quality of your gear. We provide durable trailer parts built for harsh Australian conditions. Selecting the correct couplings and parts protects your harness by limiting cable strain and movement. If you need technical help with a complex setup, contact us for expert advice. Our team knows the transport sector. We stand behind every product we sell and offer the practical support you need to stay on the road.
Secure Your Towing Electrical System
Success on the road depends on an electrical system that won’t quit. You now understand how to distinguish between standard lighting circuits and the high-current demands of modern caravan accessories. Following the 12 pin flat plug wiring diagram australia ensures that your fridge stays cold and your Electronic Stability Control remains responsive. Selecting the correct wire gauge for pins 8 through 12 is the most effective way to eliminate voltage drop and protect your equipment from heat damage. Regular terminal maintenance and checking for pin spread will keep your connection reliable for years.
We are a proudly Australian-owned and operated specialist. Every component we supply meets or exceeds Australian Design Rules (ADR) to guarantee durability in our harsh environment. We provide nationwide shipping on all components to ensure you have the right gear wherever you are located. Browse Our Professional Range of Trailer and Caravan Parts to secure high-quality connectors, cables, and hardware for your rig. Proper preparation now prevents electrical headaches later. Get your wiring right today and hit the highway with the confidence of a professional setup.
Frequently Asked Questions
Can I plug a 7 pin flat trailer plug into a 12 pin flat socket?
Yes, you can plug a standard 7-pin flat plug directly into the top row of a 12-pin flat socket. The physical dimensions and pin spacing for the first seven pins are identical across both systems. This allows you to tow a standard box trailer using a vehicle wired for a 12-pin caravan setup. You’ll only have access to lighting and signal functions since the 7-pin plug doesn’t reach the auxiliary power row.
What wire gauge should I use for the 12 pin auxiliary pins (8-12)?
Use a minimum of 6mm auto cable for pins 8 through 12 to handle high-current loads safely. These larger pins are designed for accessories like fridges and battery charging systems. Using thinner wire leads to significant voltage drop and can cause the terminals to overheat under load. Referencing the correct 12 pin flat plug wiring diagram australia ensures you apply this heavy-duty gauge to the right terminals for reliable performance.
Why do my trailer lights flicker when using a 12 pin plug?
Flickering lights usually indicate a poor earth connection at Pin 3 or Pin 10. Check for corrosion on the terminals or “pin spread” in the socket that prevents a tight physical fit. A loose earth wire behind the plug housing is another common culprit. Ensure your earth wire is secured to a clean, bare metal surface on the vehicle chassis to establish a solid, high-quality circuit base.
What color is the wire for the electric brakes on a 12 pin plug?
The wire for electric brakes is blue and connects to Pin 5 on the top row of the plug. This follows the AS 4177.5-2004 standard used throughout Australia. It’s a safety-critical connection that delivers the signal from your brake controller to the 10-inch electric drum brakes on your trailer. Always use high-quality cable for this circuit to ensure your braking system responds instantly and reliably every time you hit the pedal.
Do I still need an Anderson plug if I have a 12 pin flat plug?
You might still need an Anderson plug for very high-current applications like heavy battery charging. While a 12-pin plug handles moderate auxiliary loads, it’s limited by its physical terminal size. For running large DC-DC chargers or high-draw appliances, an Anderson plug with 8 B&S cable is often the better choice. This setup prevents the 12-pin terminals from overheating during long trips in harsh Australian conditions.
Is the 12 pin flat plug wiring standard across all of Australia?
Yes, the 12-pin wiring configuration is standardized nationally under the AS 4177.5-2004 regulation. This ensures that any vehicle wired to this standard can safely tow any trailer using the same 12 pin flat plug wiring diagram australia. Consistency across all states prevents electrical faults and blown fuses when swapping between different tow vehicles or trailers. Always verify your specific setup against this official standard to maintain legal compliance.
How do I test if my 12 pin plug is sending power to the caravan fridge?
Use a multimeter to check for 12V power at Pin 9 on the vehicle socket. Set your meter to DC volts and place the positive probe on Pin 9 and the negative probe on the auxiliary earth at Pin 10. You should see a reading between 12.6V and 14.4V when the engine is running. Testing the circuit under load provides the most accurate results for identifying voltage drop issues.
Can I wire a 12 pin plug myself or do I need an auto electrician?
You can wire a 12-pin plug yourself if you’re comfortable with electrical systems and have the right tools. It requires precision stripping, tinning, and secure terminal connections to handle high-amperage auxiliary loads. If you aren’t confident with high-current circuits, hiring an auto electrician is a safer choice. Professional installation ensures your setup meets ADR requirements and avoids potential fire risks from poor connections or undersized wiring.