Towing a heavy caravan with visible rear-end sag is more than an eyesore; it’s a mechanical risk that compromises your braking and steering at highway speeds. You’ve likely felt that unsettling light sensation in the steering wheel or watched the trailer sway as a B-double overtakes you. These dangerous issues stem from improper load balance. Achieving a precise weight distribution hitch setup is the only reliable way to shift the tongue weight back onto your vehicle’s front axles where it belongs. This ensures your tyres maintain a consistent grip on the bitumen, even in the harsh conditions of the Australian outback.
We understand that getting the tension right on your spring bars can be confusing for many trailer owners. This practical guide provides the exact steps to level your rig and ensure your setup meets heavy duty safety requirements. You’ll learn how to measure wheel arch heights accurately and adjust your hardware for maximum stability. We’ll walk through the process of setting the ball mount height and securing the chains to eliminate sway. By the end of this article, you’ll have the confidence to tackle long hauls with improved control and a perfectly balanced towing platform.
Key Takeaways
- Understand the leverage principle to transfer weight to the front axle for safer steering and braking control.
- Master the weight distribution hitch setup by using unladen measurements to establish a level and stable towing baseline.
- Learn to adjust hitch head height and tilt to achieve the correct tension across your spring bars.
- Fine-tune your configuration by interpreting measurement changes and adjusting chain links for optimal load distribution.
- Identify heavy-duty, galvanised components built to withstand harsh Australian conditions and ensure long-term reliability.
Understanding Weight Distribution and the Leverage Principle
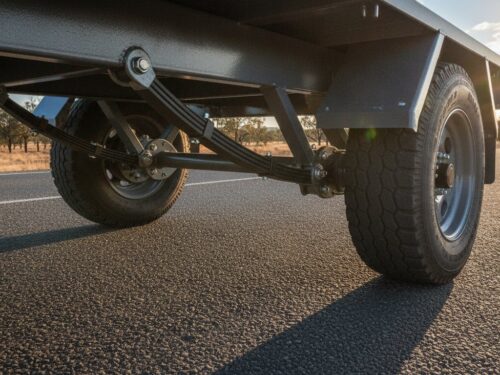
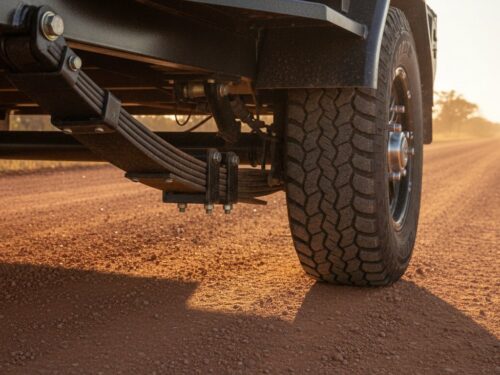
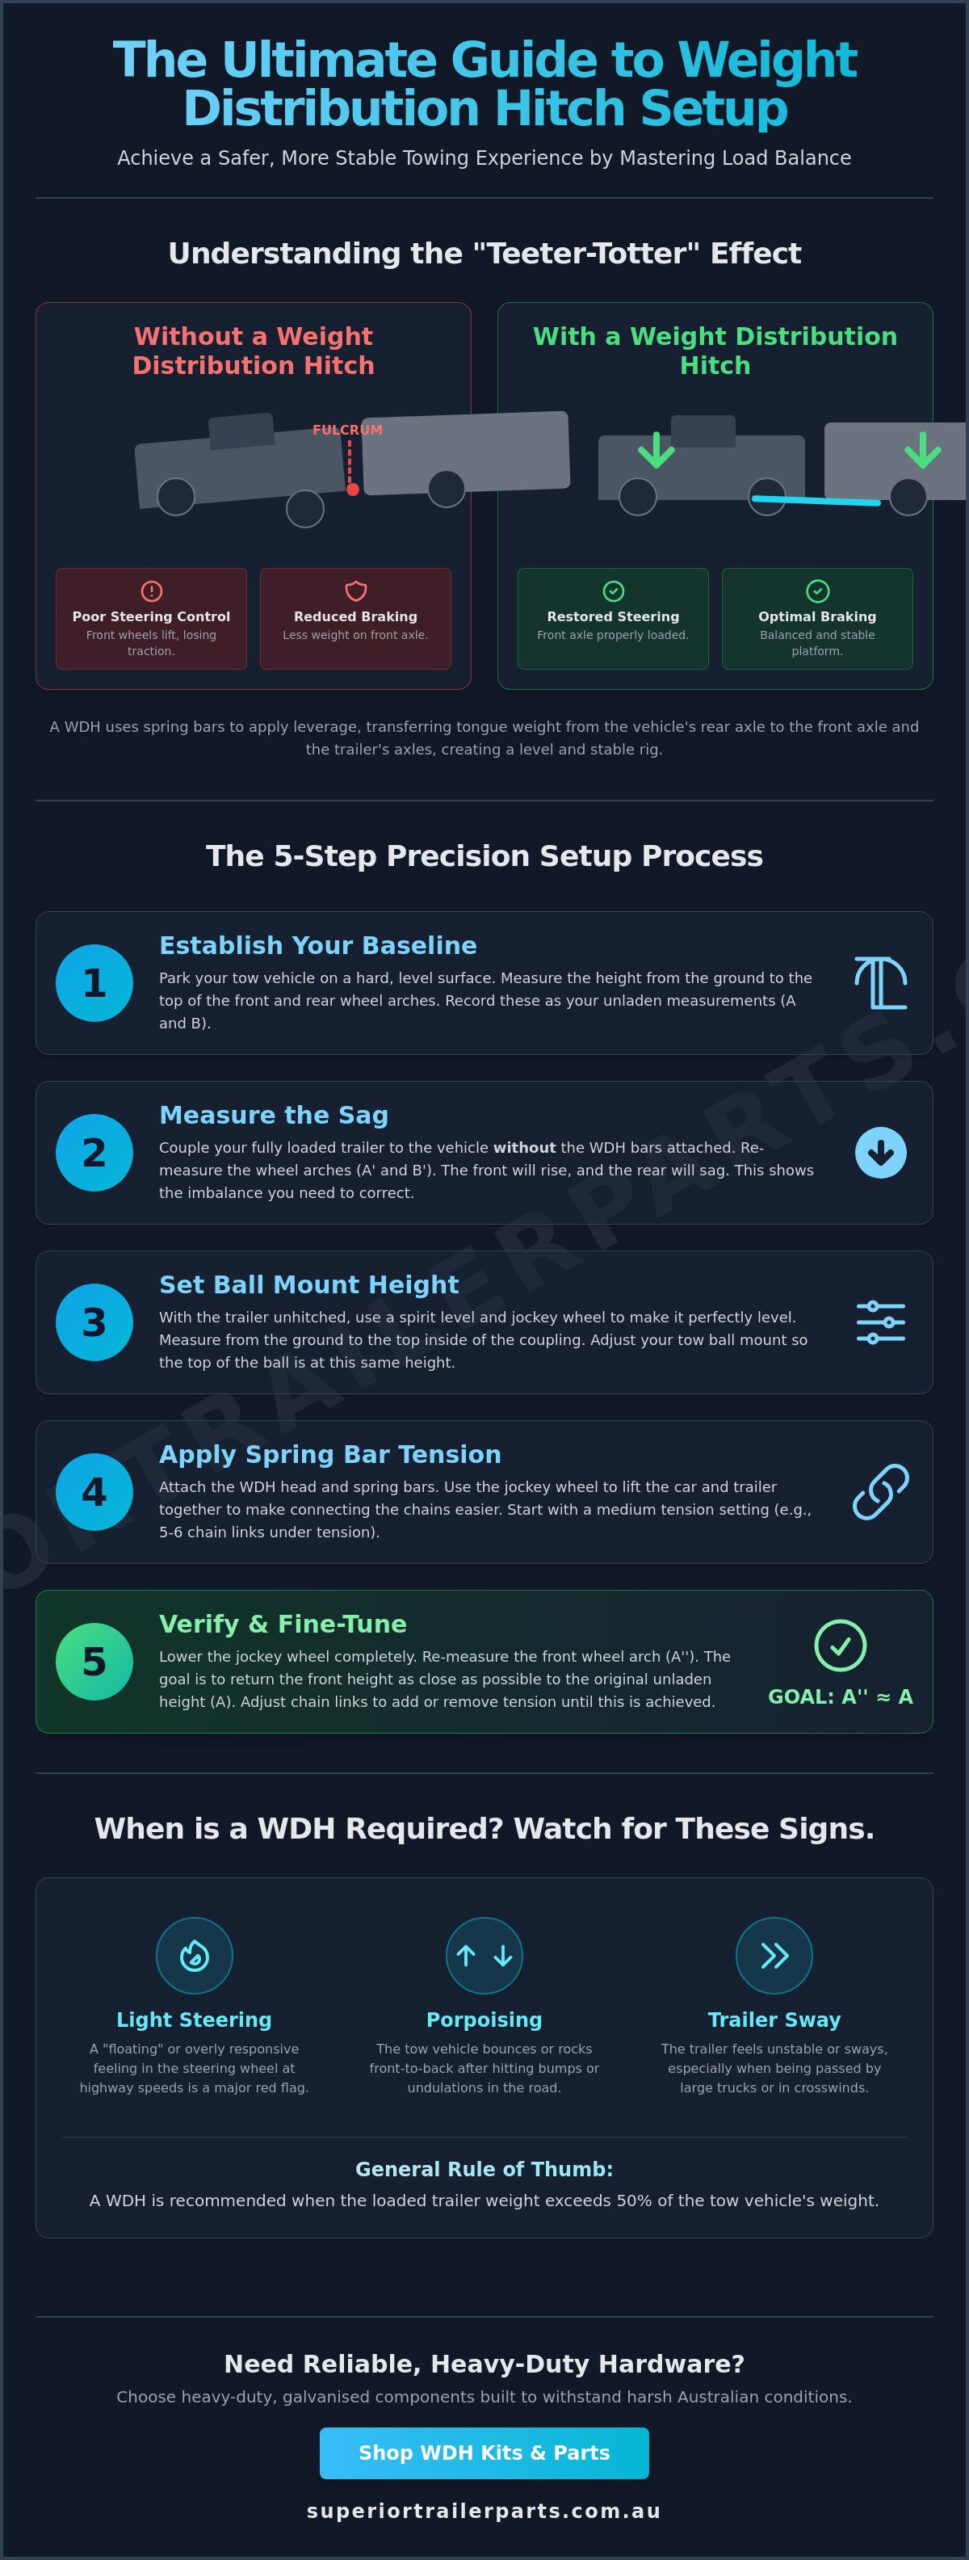
A Weight-distributing hitch (WDH) is a leverage tool. It isn’t a weight-reduction device. Many owners mistakenly believe these kits physically lighten the load on the tow ball. They don’t. Instead, a proper weight distribution hitch setup uses heavy-duty spring bars to redistribute the downward force. This force moves from the rear axle of the tow vehicle to the front axle and the trailer axles. It creates a more stable platform for long-haul travel across Australia.
Think of the spring bars as handles on a wheelbarrow. When you lift the handles, you shift weight toward the front wheel. In towing, these bars apply tension to the chassis. This tension forces the nose of the vehicle down. It ensures the front tyres maintain a solid contact patch with the road. Without this tension, the rear suspension compresses excessively. This puts unnecessary strain on your shocks and bushes, leading to premature wear.
A common misconception involves the maximum tow ball weight. Using a WDH won’t increase your vehicle’s factory-rated ball load limit. If your vehicle is rated for 350kg on the ball, adding a hitch doesn’t change that structural limit. It only manages how that weight affects the vehicle’s stance. Exceeding these limits can lead to chassis fatigue or failure. Always verify your vehicle’s GVM and towing capacities before hitting the road.
The Physics of Towing Level
A standard towing setup creates a teeter-totter effect. The rear axle serves as the fulcrum point where the trailer’s downward force acts to lift the vehicle’s front end. When the rear sags, the front wheels lose traction. This leads to light steering and reduced braking efficiency. A level setup is critical. It keeps the vehicle’s geometry correct. This allows the suspension to work as designed during cornering and emergency stops. Keeping the combination level also improves fuel economy by reducing aerodynamic drag.
When a Weight Distribution Hitch is Required
Industry standards often recommend a WDH when the trailer’s loaded weight exceeds 50% of the tow vehicle’s weight. You should look for specific warning signs during your first few kilometres. Rear-end sag is the most obvious indicator. You might also notice the front-end lifting or “porpoising” over road undulations. Light steering at highway speeds is a major red flag that requires immediate attention. A correct weight distribution hitch setup addresses these issues by restoring balance to the vehicle.
Safety depends on more than just leverage. You must also ensure your stopping power is up to the task. Check our Trailer Brakes and Calipers: Selection and Maintenance Guide for more on maintaining your braking system. Proper weight distribution combined with reliable, genuine parts ensures a stable and predictable towing experience on any terrain.
Essential Measurements for a Precise Setup
Park the tow vehicle and trailer on a perfectly level, concrete surface. Sloped driveways or soft grass provide false readings that compromise the entire weight distribution hitch setup. Ensure the trailer is fully loaded to its typical towing weight before you pull out the tape measure. A caravan carrying 100 litres of water and full gas cylinders sits differently than an empty one. This preparation ensures your measurements reflect real-world towing conditions on Australian roads.
Establishing the Baseline
Start by measuring the distance from the ground to the top of the front and rear wheel arches on the tow vehicle. Record these unladen figures clearly. You need this baseline to calculate how much the rear sinks and the front lifts once the trailer is hitched. Next, level the trailer frame using the jockey wheel and a spirit level. Measure from the ground to the top of the trailer coupling. This measurement determines your target tow ball height. Understanding the initial sag helps you adjust the spring bars to return the front axle to its original height. If the front wheel arch rises by more than 15mm after hitching, the steering becomes light and less responsive. For a detailed walkthrough of this process, see this guide on How to Install a Weight Distribution Hitch.
Tools Needed for Installation
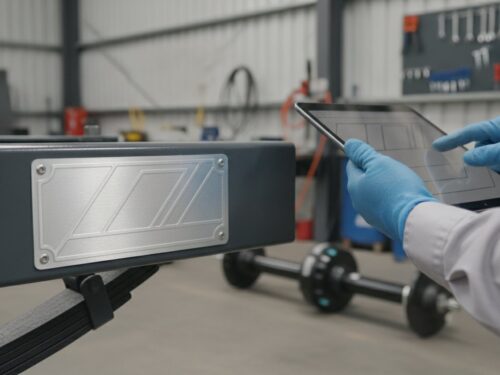
Precision requires the right equipment. Don’t guess measurements or tighten bolts by feel. Professional results depend on using tools that can handle the high torque required for heavy-duty hardware. Gather the following items before starting:
- A 5-metre steel tape measure for wheel arch and coupling heights.
- A 600mm spirit level to ensure the trailer frame is perfectly horizontal.
- A heavy-duty torque wrench capable of at least 300 Nm.
- A socket set with sizes ranging from 19mm to 38mm.
- Leather gloves and sturdy, steel-cap footwear for protection.
Spring bars are under high tension. One slip can cause serious injury if you aren’t wearing the proper gear. Always use the lift handle provided with your kit to engage the chains or brackets. If you find your current hardware is worn or under-rated, browse our selection of couplings and parts to find a reliable replacement. Using the correct tools ensures the weight distribution hitch setup remains secure through thousands of kilometres of travel.
Steps for Installing and Adjusting the Hitch
Executing a proper weight distribution hitch setup requires precision and the right tools. You aren’t just joining a trailer to a vehicle; you’re recalibrating the physics of your entire towing rig. Follow these steps to ensure your gear handles the heavy-duty demands of Australian roads.
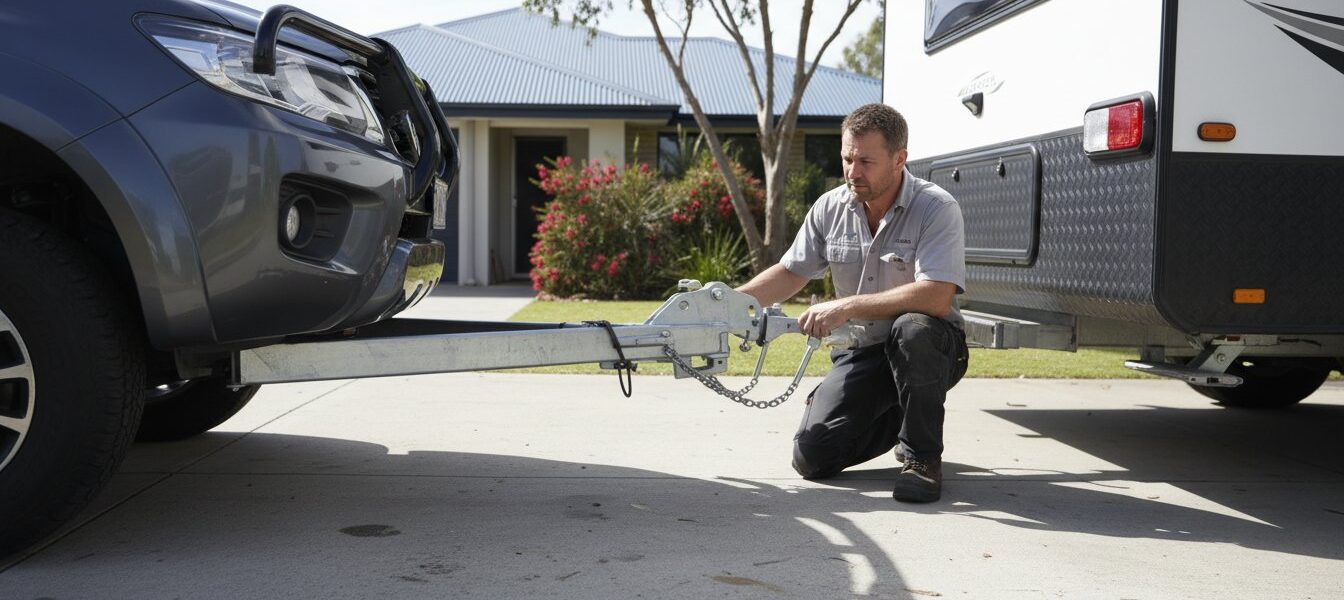
Setting the Hitch Head and Shank
Start by inserting the drop shank into the vehicle receiver and securing it with a rated hitch pin. Park both the vehicle and trailer on level ground. Measure the height of the trailer coupler while the trailer is level. You’ll need to position the hitch head on the shank so the top of the tow ball sits approximately 20mm to 25mm higher than the coupler. This height difference accounts for the initial compression of the vehicle suspension.
Secure the head to the shank using the heavy-duty bolts provided in your kit. Before tightening, adjust the head angle. Most systems use spacer washers or a cam-pin to tilt the head downward toward the trailer. This angle is vital. It dictates the leverage potential of the spring bars. A steeper downward angle allows for more weight transfer to the front axle, which is essential for maintaining steering control under load.
Tensioning the Spring Bars
Back your vehicle into position. Lower the trailer coupler onto the ball and engage the locking mechanism. Don’t retract the trailer jack yet. Instead, use the jack to raise both the trailer tongue and the rear of the tow vehicle together. This technique reduces the tension required to snap the spring bars into place, making the process significantly safer for the operator.
Mount the snap-up or hook-up brackets onto the trailer A-frame. These are typically positioned about 700mm to 750mm back from the centre of the coupler. Attach the spring bars to the hitch head and swing them toward the brackets. Engage the chains or lift units. Once the bars are secure, lower the jack completely. Measure the height of the vehicle wheel arches again. A successful weight distribution hitch setup should return the front wheel arch height to within 0mm to 10mm of its original, uncoupled measurement.
Final Torque and Safety Checks
Verify that every bolt is tightened to the manufacturer’s specific torque requirements. Heavy-duty shank bolts often require between 250Nm and 350Nm of torque to remain secure under constant vibration. Use a calibrated torque wrench for this task rather than guessing with a standard spanner.
Check the clearance of the spring bars. They must have enough room to slide or pivot during tight turns. If the bars contact the trailer frame or the brackets bind, you risk bending components or snapping chains. If you find any damaged components during your inspection, replace them immediately with high-quality couplings and parts to ensure your rig remains roadworthy. Perform a short test drive and re-torque all fasteners after the first 50 kilometres of travel.
Fine-Tuning and Troubleshooting Your Towing Setup
Achieving a level weight distribution hitch setup requires more than a single adjustment. You must verify how the vehicle reacts under load to ensure safety. Use a tape measure to check the distance from the ground to the top of your wheel arches. This physical data confirms if the weight is moving where it belongs. Proper fine-tuning prevents premature tyre wear and maintains steering control on corrugated Australian roads.
Analysing Wheel Arch Measurements
Your target is the “50-100% return” rule common in Australian towing standards. Measure the front wheel arch unladen. When you hitch the trailer, the front end will rise as weight moves to the rear. Adjust your spring bars until the front arch returns at least 50% of the way back to its original height. Professional installers often aim for a 100% return for maximum stability. Never transfer so much weight that the front arch sits lower than its unladen measurement. This indicates over-tensioning. Excessive tension puts extreme stress on the vehicle chassis; it can lead to structural cracks or a loss of rear-wheel traction during emergency braking.
If you need more lift, reduce the number of active chain links or increase the rearward tilt of the hitch head. Each link adjustment typically alters the weight distribution by 20 to 40 kilograms. Small changes make a significant difference in how the rig tracks at highway speeds. Always perform these adjustments on a flat, concrete surface to get accurate readings.
Solving Common Performance Issues
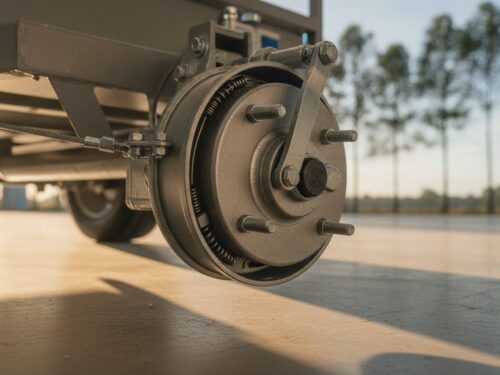
“Porpoising” or rhythmic bouncing often indicates insufficient spring bar tension. If the ride feels soft or the front end feels light, increase the tension by one link. If the trailer still sways after a level setup, look inside the trailer. Internal load distribution is a primary cause of instability. Aim for 60% of the cargo weight to sit forward of the trailer axles. A rear-heavy trailer will wag regardless of how well the hitch is tuned. Check your axles to ensure you aren’t exceeding their rated capacity. Overloaded axles lead to bearing failure and poor tracking on the road.
- Check tyre pressures: Ensure both tow vehicle and trailer tyres are at the manufacturer’s recommended “loaded” PSI.
- Inspect friction pads: If your hitch uses integrated sway control, check the pads for grease or debris.
- Verify head tilt: Ensure the hitch head hasn’t shifted under the initial load.
For heavy-duty components that handle tough Australian conditions, browse our range of trailer parts to upgrade your rig today.
Selecting Reliable Hardware for Australian Conditions
Australian roads demand more from your equipment than a standard highway drive. Heat, salt air, and corrugated tracks will find the weak points in any towing rig. Your weight distribution hitch setup requires components engineered for these specific conditions. Opting for heavy-duty, galvanised hardware isn’t a luxury; it’s a necessity for longevity and safety. Cheap, painted alternatives often succumb to rust within 12 months when exposed to coastal environments or winter road salt.
Comparing light-duty shepherd’s crook systems to heavy-duty round bar setups is a vital part of the selection process. Shepherd’s crooks are suitable for lighter loads, typically under 1,500kg, but they lack the vertical clearance needed for many Australian driveways and off-road tracks. Heavy-duty round bar systems offer better ground clearance and handle higher tongue weights with ease. You must ensure every part of your assembly is ADR-compliant. This compliance guarantees the hardware meets national safety standards for strength and design, protecting you legally and physically on the road.
Quality Components and Durability
Quality hardware starts with Australian-owned expertise. Local manufacturers design parts to handle the specific GVM requirements of the local market. Marine-grade galvanising is critical for anyone operating boat trailers or towing near the ocean. Saltwater causes rapid oxidation on raw steel, which can lead to catastrophic structural failure at highway speeds. Investing in reliable trailer parts means you’re buying peace of mind for your next long-haul trip. Durable components reduce the risk of downtime and expensive mid-trip repairs.
Ongoing Maintenance for Hitch Assemblies
A set-and-forget approach leads to equipment failure. You should apply a high-pressure grease to the hitch head sockets and the friction points of the spring bars every 1,000 kilometres. This simple task prevents metal-on-metal grinding and reduces heat build-up. Regular inspections are also mandatory to ensure the system remains secure. Focus your attention on these areas:
- U-bolts and Brackets: Check U-bolts for correct torque settings. Even a 2mm shift in a bracket can compromise the effectiveness of your weight distribution hitch setup.
- Spring Bars: Look for signs of stress, such as hairline cracks or permanent deformation.
- Hitch Pin: Inspect the pin and clip for wear or bending.
- Corrosion: Use a wire brush to remove surface rust and touch up galvanised surfaces with cold-gal spray.
Vibrations from rough roads can loosen fasteners over time. If you notice any ovaling in the bolt holes or movement in the frame brackets, replace the hardware immediately. For expert advice on selecting and maintaining your towing hardware, reach out to the team at Superior Trailer Parts. We provide expert advice to ensure your rig is safe and compliant for any journey across the country.
Master Your Towing Stability Today
A correct weight distribution hitch setup is the difference between a dangerous journey and a controlled tow. You’ve learned how the leverage principle restores weight to your front axles and why precise measurements are non-negotiable for safety. Always verify your hardware meets Australian Design Rules to ensure it handles the stress of corrugated roads and heavy loads. We offer the gear and the technical knowledge to get your rig balanced. Our team provides expert advice for DIY projects and trade professionals across the country. As an Australian Owned and Operated business, we ship nationwide Australia wide to keep your trailer moving. High-quality components provide the resilience needed for harsh local environments. Invest in reliable equipment that stands up to the job every time. You’ll feel the difference in handling as soon as you hit the bitumen.
Browse our range of heavy-duty weight distribution hitches and trailer parts
Get your trailer sorted and enjoy a safer drive on your next trip.
Frequently Asked Questions
Does a weight distribution hitch reduce my tow ball weight?
No, a weight distribution hitch setup doesn’t reduce the physical tow ball weight. It uses leverage to redistribute that load across the tow vehicle’s front axle and the trailer’s wheels. Your tow ball still carries the same static load, so you must stay within your vehicle’s maximum ball weight rating. Check your compliance plate to ensure your load doesn’t exceed the manufacturer’s limit.
Can I use a weight distribution hitch on an off-road trailer?
You shouldn’t use a standard weight distribution hitch for serious off-road driving. These systems restrict the vertical movement between the vehicle and trailer, which can damage the chassis or hitch when navigating steep washouts or uneven terrain. If you’re driving on graded gravel roads, it’s usually fine. For heavy 4WD tracks, remove the spring bars to prevent equipment failure or structural damage to your trailer frame.
How many chain links should be under tension on my hitch?
Most setups require at least 5 links under tension to allow for adequate movement during turns. Never operate with fewer than 5 links; this restricts the bars too much and can cause the chains to snap or the brackets to bend. If you need more tension to level the vehicle, adjust the tilt of the hitch head instead of shortening the chain further. Refer to your specific manufacturer’s manual for exact link counts.
Is it safe to back up my trailer with a weight distribution hitch attached?
You can safely reverse with most weight distribution hitches attached, provided you avoid tight jackknife angles. Sharp turns while backing up can cause the spring bars to bind or pop out of their brackets. If your system includes a separate friction sway control bar, you must loosen or remove it before reversing. This prevents the small friction slide from bottoming out and bending the mounting balls.
Can a weight distribution hitch stop all trailer sway?
A weight distribution hitch setup improves stability but won’t eliminate all trailer sway on its own. While it restores steering control by putting weight back on the front wheels, sway is often caused by poor load balancing or high winds. Ensure 10% to 15% of your trailer’s total weight is on the tow ball. If sway persists, you’ll need a dedicated friction or electronic sway control system to manage lateral movement.
What happens if I over-tension my weight distribution bars?
Over-tensioning the bars transfers too much weight away from the rear drive wheels, which reduces traction and braking efficiency. This often results in the rear of the tow vehicle sitting higher than its unladen height. Excessive tension puts 100% of the stress on the trailer A-frame and vehicle hitch receiver. This can lead to cracked welds or a bent chassis. Always aim for a level ride height rather than lifting the rear excessively.
Do I need a weight distribution hitch if my vehicle has air suspension?
You still need a weight distribution hitch even if your vehicle has self-levelling air suspension. Airbags simply level the vehicle’s body; they don’t shift the weight back to the front steering axle. Without a WDH, your front tyres remain light, which compromises steering and braking performance. Australian towing experts recommend using both systems together to ensure the vehicle remains level and the front axle maintains 100% of its required ground contact.