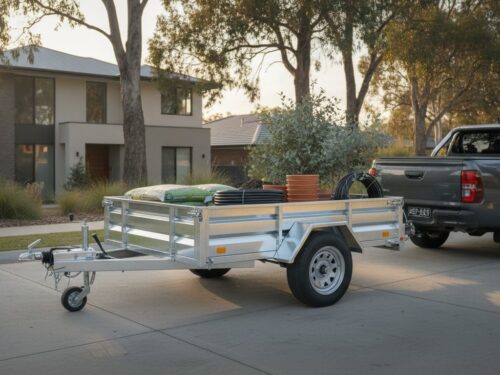
A highway breakdown at 100km/h is rarely a matter of bad luck; it’s almost always a result of neglected maintenance. You likely know the stress of pulling over to touch a hub that’s running too hot or the frustration of a wiring harness that refuses to cooperate. It’s difficult to tow with confidence when you’re uncertain if your wheel bearings will survive the trip or if your brake lights are actually visible. This diy trailer maintenance checklist provides a practical, step-by-step framework to inspect your equipment like a professional specialist. We’ll show you exactly how to identify worn components before they fail, saving you from high-cost emergency repairs and keeping your gear roadworthy. We’ll walk through critical inspection points including heavy-duty suspension, galvanised chassis integrity, and reliable electrical connections to ensure your trailer handles the toughest Australian conditions. You’ll learn to spot the difference between surface rust and structural fatigue, giving you the certainty needed for long-haul reliability. This guide focuses on the durable, marine-grade components required to withstand local salt and dust, ensuring your trailer remains a tool rather than a liability.
Key Takeaways
- Prevent expensive “cascading failures” by identifying minor issues before they destroy heavy-duty components like axles and hubs.
- Implement a systematic diy trailer maintenance checklist using the “Look, Touch, Listen” method to ensure roadworthiness on Australian highways.
- Learn how to detect failing wheel bearings and suspension wear through simple heat and sound diagnostic techniques.
- Secure your load by mastering the maintenance of mechanical drum brakes, electric systems, and marine-grade components for boat trailers.
- Maximise equipment longevity with expert advice on protecting galvanised frames and moving parts from harsh environmental damage.
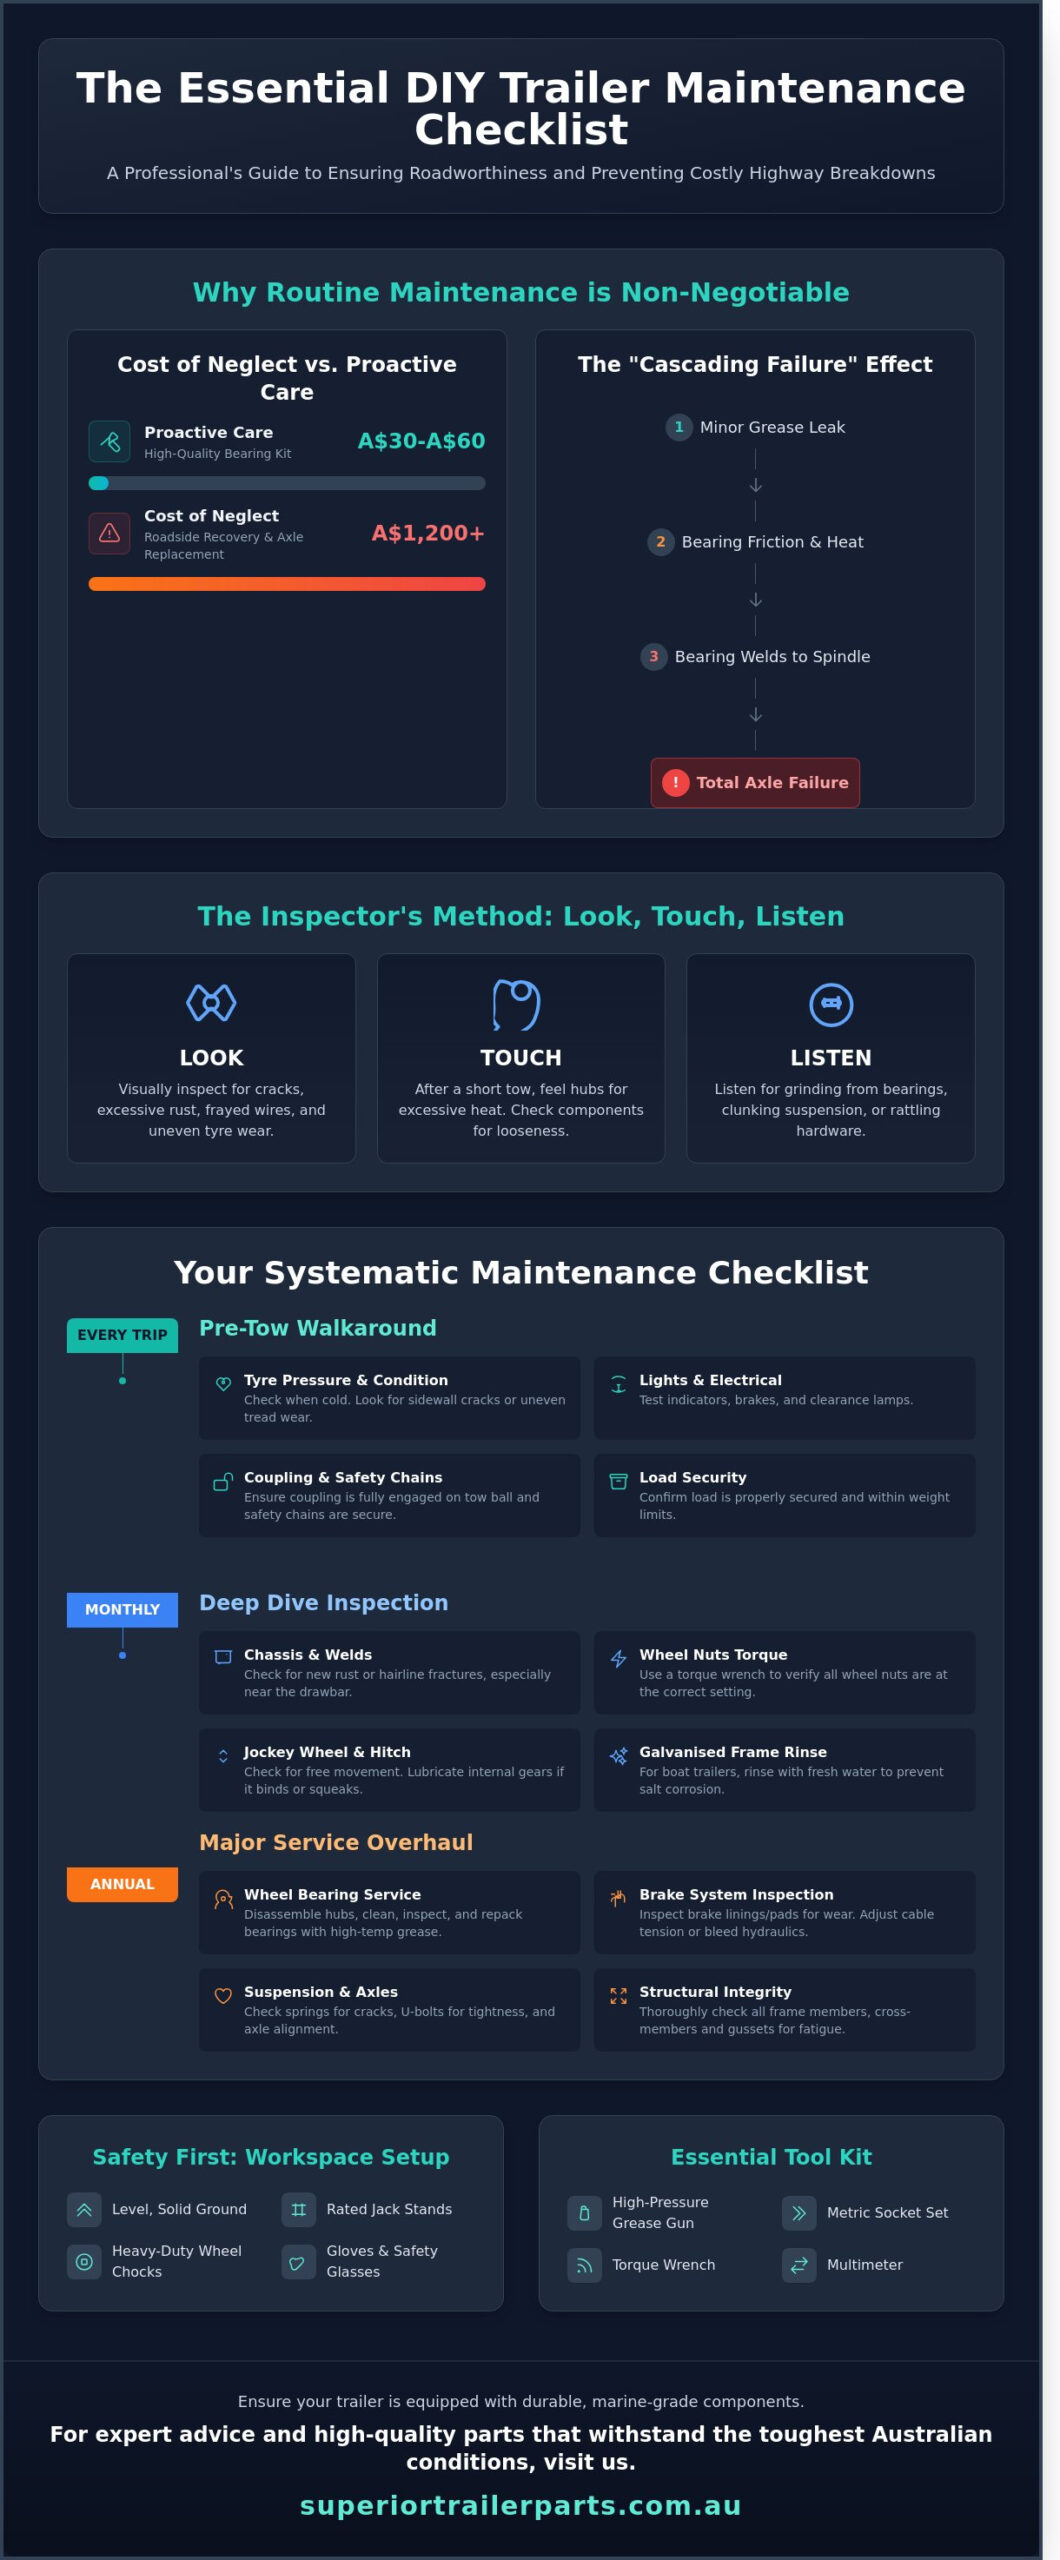
Why Routine Trailer Maintenance is Non-Negotiable
Neglecting your trailer is a liability you can’t afford. On Australian highways, a mechanical failure at 110km/h often results in a total loss of control or a fatal roll-over. Every Trailer (vehicle) used on public roads must comply with the Australian Design Rules (ADR). These regulations ensure that braking systems, lighting, and structural components meet specific safety standards. Regular inspections using a diy trailer maintenance checklist help you identify wear before it becomes a legal or safety crisis.
The Cost of Neglect vs. Proactive Care
Setting Up Your Workspace for Safety
The Essential DIY Trailer Maintenance Checklist
Before every long trip, inspect all essential trailer parts to prevent roadside breakdowns. Compliance with national standards is mandatory for safety. All light trailers must adhere to the technical requirements outlined in the Vehicle Standards Bulletin 1 (VSB 1), which governs everything from dimensions to braking systems. Keeping your trailer within these specifications protects your insurance and other road users.
Pre-Tow Walkaround (Every Trip)
Safety starts before the engine turns over. Check tyre pressure when cold. Under-inflated tyres account for a significant percentage of trailer-related fuel inefficiency and increased blowout risks. Look for sidewall cracking or uneven tread wear. Test all indicators, brake lights, and clearance lamps. Ensure the coupling is fully engaged on the tow ball and the safety chain is securely attached with a rated D-shackle. A loose connection can lead to catastrophic failure at highway speeds.
Monthly Deep Dive Inspection
A monthly check identifies issues before they become expensive repairs. Inspect the chassis for new rust spots or hairline fractures in the welds, especially near the drawbar. Use a torque wrench to verify wheel nut settings. Vibrations from Australian roads can loosen fasteners over time. Check that the jockey wheel moves freely. If it binds or squeaks, apply a marine-grade lubricant to the internal gears to ensure smooth operation during your next launch or load.
Annual Major Service Tasks
Set aside time once a year for a heavy-duty overhaul. Pull the hubs to disassemble and repack wheel bearings with high-quality grease. Inspect brake linings for wear and adjust cable tension to ensure even braking force across all wheels. Examine suspension bushes and spring hangers for excessive play. If you notice more than 2mm of movement in the bushes, it’s time for a replacement. Maintaining these core components extends the life of your investment. If you find worn components during your inspection, browse our range of heavy-duty axles and suspension gear to get back on the road quickly.
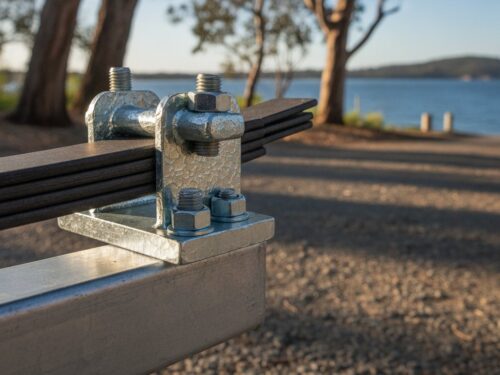
Servicing the Rolling Gear: Bearings, Axles, and Suspension
Rolling gear takes the brunt of Australian road conditions, from highway speeds to corrugated bush tracks. You need to keep these parts in top shape to avoid a roadside breakdown. A solid diy trailer maintenance checklist always prioritizes the components that move and support the weight of your load. If these parts fail, your trailer stops moving or becomes a safety hazard to other road users.
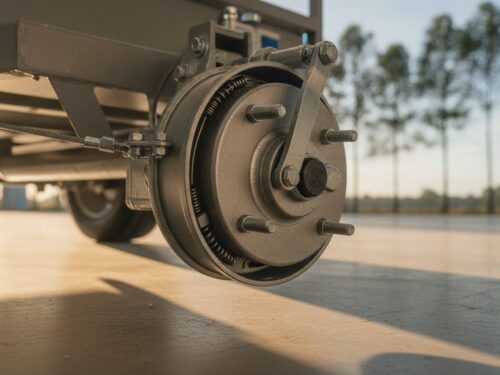
Failing wheel bearings usually give warning signs before they seize. Listen for a low growl or humming sound while driving at speed. After a trip, touch the wheel hub carefully. If it’s too hot to hold, the bearing is likely failing or lacks lubrication. Properly aligned axles ensure your tyres wear evenly and the trailer tracks straight behind your vehicle. Misalignment often stems from hit kerbs or overloaded trailers. For professional standards, refer to the National Heavy Vehicle Inspection Manual to ensure your trailer meets Australian safety requirements.
Wheel Bearing Inspection and Maintenance
Jack up the trailer and secure it on stands. Grab the tyre at the top and bottom, then shake it firmly. If you feel movement or “play,” the bearings need adjustment or replacement. This simple check is a core part of any diy trailer maintenance checklist and should be done every six months.
- Visual Grease Check: Remove the dust cap. Healthy grease holds its consistency and colour. Burnt grease smells acrid and looks black or watery.
- Water Ingress: Milky or cloudy grease indicates water has entered the hub, which is common for boat trailers.
- Repacking: You can often clean and repack bearings if the metal surfaces are smooth and shiny.
- Replacement: If you see pitting, scoring, or blue discolouration from heat, replace the entire bearing set immediately.
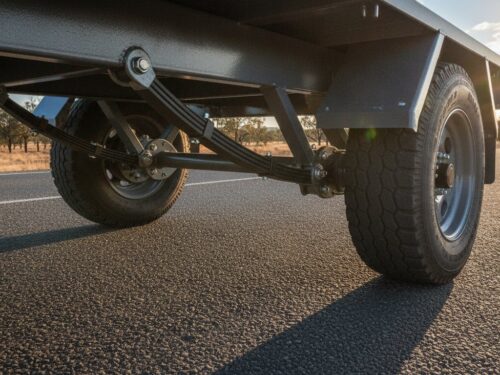
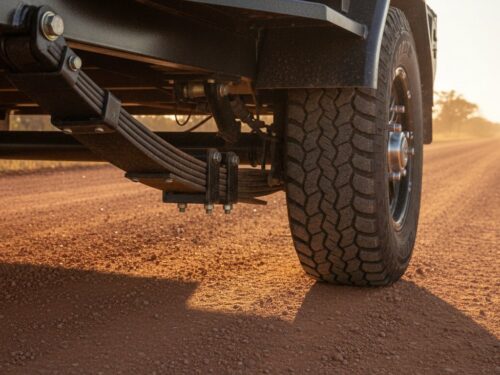
Suspension and Leaf Spring Health
Your leaf springs should have a clear, distinct arch. Flat or sagging springs mean the steel has fatigued and can no longer support the rated load effectively. Inspect each leaf for cracks or “walking,” where individual leaves shift out of alignment from the stack. This usually indicates a broken centre bolt.
Check your U-bolts for tightness. These bolts can stretch over time, especially when hauling heavy equipment over uneven terrain. Tighten them to the manufacturer’s torque specifications to prevent the axle from shifting. Finally, grease your shackle pins and rockers. Regular lubrication prevents metal-on-metal wear and keeps the suspension operating quietly and smoothly. If the nylon or brass bushes are worn thin, swap them out to maintain your trailer’s stability.
Braking Systems and Electrical Integrity
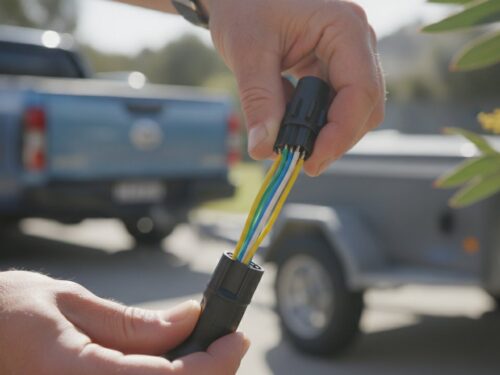
Brake failure and electrical shorts represent the two most common causes of trailer-related incidents on Australian roads. Reliable stopping power is non-negotiable when hauling heavy loads through varying terrain or high-traffic areas. Your diy trailer maintenance checklist must prioritize these systems to ensure safety and legal compliance. Mechanical drum brakes rely on physical cable tension, while electric brakes use an electromagnetic actuator to apply pressure. Electric systems are standard for trailers exceeding 2,000kg GTM. High salt content in Australian coastal air accelerates copper oxidation within trailer plug wiring. This leads to high resistance and total signal loss. Test your braking force by performing a slow speed stop at 10km/h using only the manual override on your in-car controller. The trailer should pull the vehicle to a halt without locking the wheels or pulling to one side.
Brake Adjustment and Component Wear
Smooth stopping power starts with a correctly calibrated brake controller. Set the gain so the trailer brakes engage just before the tow vehicle’s brakes to prevent jackknifing. Inspect disc pads or drum shoes for wear during every service interval. Replace these components if the friction material is less than 1.5mm thick. Examine brake lines and cables for signs of fraying or rust. Even minor corrosion can lead to a snapped cable under emergency braking pressure. Apply a light coating of marine-grade grease to moving mechanical linkages to prevent seizing, especially if the trailer sits idle for long periods.
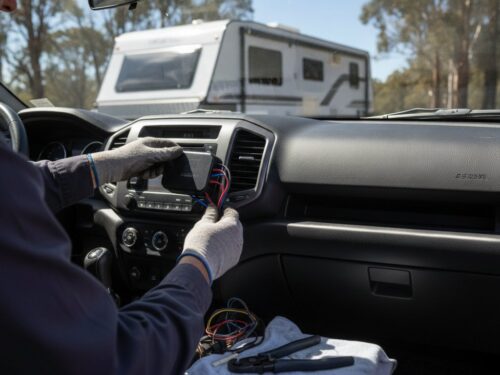
Wiring and Lighting Troubleshooting
Corroded terminals in 7-pin or 12-pin plugs cause most lighting failures. Clean these pins with a wire brush and apply electrical contact cleaner to maintain a strong connection. Flickering lights often indicate a “bad earth” where the ground wire has lost contact with the trailer frame. Ensure all earth points are bolted to clean, bare metal rather than painted surfaces. Upgrading to submersible LED units provides superior longevity compared to traditional bulbs. These units feature an IP68 rating, which prevents water ingress during boat launches or heavy rain. High-quality LEDs handle the vibrations of corrugated outback roads better than fragile filaments.
Maintain your stopping power and visibility with professional-grade components. Shop heavy-duty trailer parts and accessories to keep your rig roadworthy across Australia.
Maintaining Specialised Trailers: Boat and Tipper Units
Marine Environment Protection
Inspect your rollers and skids frequently. Rollers should spin freely without resistance. If you find flat spots, replace them immediately to prevent hull damage. Seized brackets are common in older units; use a marine-grade lubricant to keep them moving. Maintaining your winches and straps is equally critical. Check for fraying or sun damage on the webbing. A snapped strap during recovery is a major safety hazard. Using quality boat trailer parts ensures your vessel stays secure on the highway.
Heavy-Duty Tipper and Plant Trailer Care
Tipper trailers rely on hydraulic integrity. Check your hydraulic fluid levels monthly and look for signs of contamination. Inspect the rams for leaks, pitting, or scoring. A leaking ram loses lifting power and can cause the tray to drop unexpectedly. If the fluid looks milky, water has entered the system and you need a full flush.
- Lubricate Pivot Points: Use a high-pressure grease gun on all heavy-duty hinges. This clears out grit and prevents metal-on-metal wear.
- Check Hydraulic Hoses: Look for bulging or cracks. Replace hoses every 2 to 4 years regardless of appearance if they operate under high pressure.
- Inspect Chassis Welds: Examine the heavy-duty tandem trailers chassis for stress cracks. Focus on the hoist mount and axle hangers where load stress is highest.
Secure Your Load and Hit the Road Safely
Regularly running through a diy trailer maintenance checklist ensures your equipment handles heavy loads and harsh terrain without failure. Neglecting your bearings or braking system often leads to costly roadside repairs and dangerous towing conditions. Focus on the rolling gear first. Check your hubs for heat and ensure your suspension components remain free of excessive wear. Australian roads are unforgiving on trailers. Using heavy-duty, galvanised parts is the best way to prevent corrosion and structural fatigue over time. Road safety data indicates that mechanical issues, particularly bearing failure and tyre blowouts, are primary causes of trailer-related breakdowns on regional routes.
Superior Trailer Parts provides the gear you need to maintain peak performance. We’re 100% Australian Owned and Operated, offering Nationwide Shipping and Expert Technical Advice for every project. We understand the demands of the local environment. Don’t risk a breakdown when reliable, competitive components are just a click away. Our team ensures you get the right fit for your specific axle or braking setup every time.
Browse our range of high-quality Australian trailer parts to find genuine, marine-grade, and heavy-duty solutions today. Keep your trailer in top condition and tow with confidence.
Frequently Asked Questions
How often should I grease my trailer wheel bearings?
Can I perform trailer maintenance myself or do I need a mechanic?
What are the most common signs of a failing trailer axle?
Uneven tyre wear and a visible “bow” in the beam are the most common signs of a failing trailer axle. If you notice the inside edges of your tyres wearing faster than the outside, your axle is likely bent or overloaded. A 3mm misalignment can lead to heat buildup and premature bearing failure. Inspect the axle for cracks or heavy scale rust that compromises the structural integrity of the steel.
Is it better to repair or replace a rusted trailer frame?
How do I know if my trailer leaf springs need replacing?
Look for flattened arches or cracked leaves to determine if your leaf springs need replacing. If the trailer sits lower on one side or bounces excessively on uneven roads, the spring temper has likely failed. Check the shackle bolts and bushes for 2mm or more of play. Worn bushes cause the axle to shift, which ruins your tyre alignment and makes the trailer pull to one side during transit.
What is the correct tyre pressure for a loaded box trailer?
Inflate loaded box trailer tyres to 300 kPa (44 psi) for standard 14-inch light truck tyres. Refer to the tyre sidewall for the maximum pressure rating, as under-inflation causes 90% of trailer tyre blowouts due to heat buildup. Check pressures when the tyres are cold for an accurate reading. Correct inflation ensures your trailer handles predictably and improves fuel efficiency during long-distance towing across the country.
Why are my trailer lights flickering when I drive?
A faulty earth connection is the reason for 80% of flickering trailer lights. Check the 7-pin or 12-pin plug for green corrosion on the brass terminals and clean them with a wire brush. Ensure the white earth wire has a solid, metal-to-metal connection with the trailer chassis. Vibrations during travel often loosen these connections, so use star washers to keep your ground points secure and reliable for night driving.
How do I test my electric brakes before a trip?
Test your electric brakes by using the manual override on your brake controller while driving at 10 km/h in a safe area. You should feel the trailer pull back on the tow vehicle without the wheels locking up completely. Check that the breakaway battery shows at least 12.6 volts on a multimeter before you depart. This ensures the system has enough power to stop the trailer if it becomes disconnected from your vehicle.