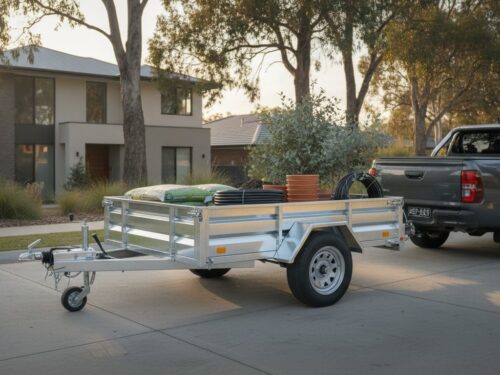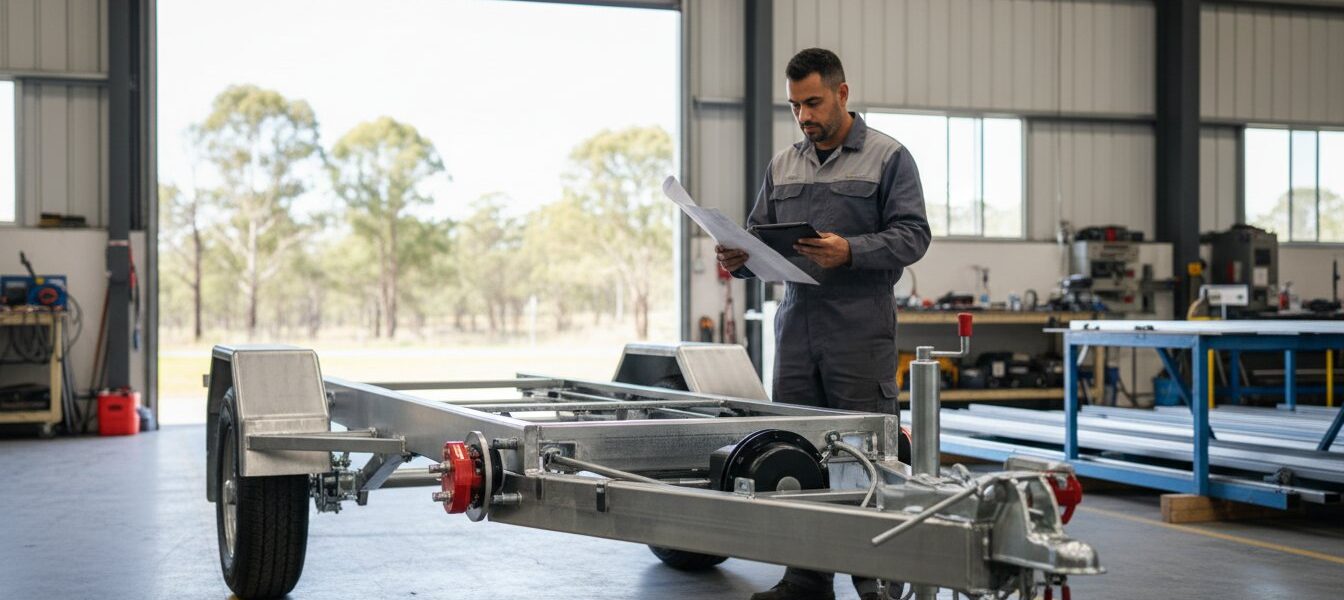
A trailer that looks solid in the workshop can still be a liability the moment it hits the highway. Most fabrication failures don’t happen because of a poor weld; they happen because of a poor plan. When you’re avoiding common trailer building mistakes, you have to look beyond the steel frame. Every component must work as a unified system. A simple misunderstanding of ATM and GTM ratings leads to rejected registrations or dangerous mechanical failures at speed.
You value durability and need hardware that stands up to harsh conditions. We understand the frustration of component incompatibility and the stress of strict Australian inspection standards. This article shows you how to identify and prevent the most frequent errors in trailer construction. You’ll learn to select the right axles and ensure your braking system meets Australian Design Rules. We’ll preview the essential steps to ensure your build is structurally sound, fully compliant, and ready for the road on the first attempt.
Key Takeaways
- Differentiate between ATM and GTM ratings to keep your build road-legal and compliant with national standards.
- Select axles and springs based on rated capacity rather than guesswork to avoid mechanical failure under load.
- Focus on avoiding common trailer building mistakes like improper drawbar length and weak structural joins.
- Use the 60/40 weight distribution rule to ensure stable handling and correct tow ball weight at highway speeds.
- Prioritise galvanised components and submersible lighting to protect your trailer from harsh conditions and corrosion.
Navigating Australian Design Rules and Capacity Ratings
Compliance is the foundation of any trailer project. Australian Design Rules (ADRs) set the benchmark for road safety and structural integrity. Ignoring these standards results in registration failure or, worse, mechanical collapse on the road. Success in avoiding common trailer building mistakes depends on understanding how capacity ratings interact across your entire assembly. You cannot simply build a heavy frame and expect it to carry a heavy load if your individual components aren’t up to the task.
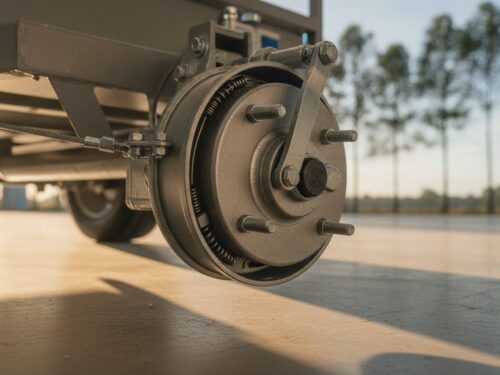
Every trailer must have a permanently fixed VIN plate. This is not a suggestion; it is a legal requirement. This plate must be legible and include the manufacturer’s name, the Vehicle Identification Number, the Aggregate Trailer Mass (ATM), and tyre specifications. Additionally, any trailer with an ATM exceeding 750kg must be fitted with an efficient braking system. For builds reaching this threshold, you must install reliable hardware like 9-inch mechanical drum brakes or 10-inch electric drum brakes to remain compliant with ADR 38/05.
Understanding ATM vs GTM for Build Planning
Aggregate Trailer Mass (ATM) is the total weight of the trailer and its full load when it is not connected to a towing vehicle. Gross Trailer Mass (GTM) differs because it measures the weight transmitted to the ground through the trailer wheels when it is hitched to a vehicle. This distinction is vital because it affects how you calculate your load limits. Understanding these ratings is critical for maintaining trailer stability principles and ensuring the tow vehicle handles correctly under load.
Always plan your build based on the lowest-rated component in your setup. If you use 50mm square axles rated for 1400kg but pair them with 4 leaf slipper springs rated for only 1000kg, your legal ATM is 1000kg. Exceeding the capacity of a single part voids your compliance and creates a significant safety risk. Match your components carefully to ensure the entire system supports your intended target weight.
Compliance Requirements for Safety Chains
Safety chains are your last line of defence. They must be permanently marked with a rating that matches or exceeds the ATM of the trailer. For trailers up to 2.5 tonnes, one safety chain is required; beyond that, you must use two. Attach the chains as close as possible to the coupling to prevent the drawbar from hitting the ground if the connection fails. This setup ensures the trailer remains controlled during an emergency disconnect.
Avoid the frequent error of welding the chain links directly to the drawbar. The intense heat from a welder alters the molecular structure of the steel, making the chain brittle and prone to snapping under tension. Instead, use a rated attachment point or a hammerlock. This maintains the integrity of the chain and ensures it performs as intended during a failure. Proper attachment is a hallmark of avoiding common trailer building mistakes that lead to inspection rejection.
Selecting the Right Components for Your Build
Selecting hardware requires a precise match between component ratings and the intended load. A common error involves choosing parts based on availability rather than technical specifications. Success in avoiding common trailer building mistakes depends on a systematic approach to hardware selection. If axles or springs are not rated for the final Aggregate Trailer Mass, the assembly will show signs of premature fatigue and instability. High-quality components ensure the trailer handles predictable forces on the road.
Every component must function as part of a unified system. Using axles with a lower rating than the frame’s capacity creates a structural bottleneck. When selecting hardware, confirm the load limit of every part. A trailer is limited by its lowest-rated component. Ensure the suspension supports the cargo weight without bottoming out. Check our range of trailer parts to start with the correct specifications.
Axle and Hub Compatibility
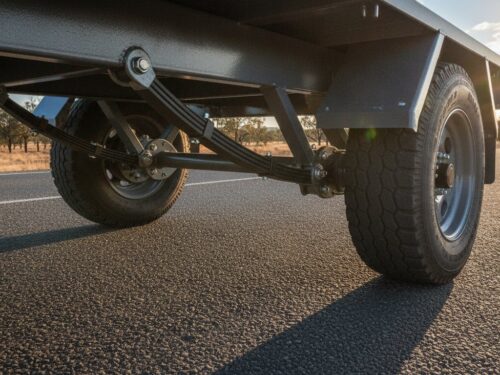
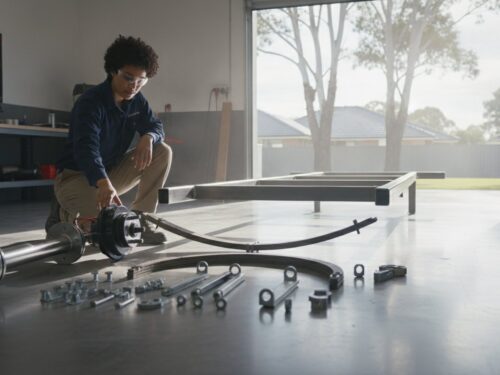
Axle choice dictates the trailer’s total carrying capacity. Light utility builds often use 39mm round axles. For larger box trailers or heavy equipment transporters, use 45mm or 50mm square axles. Square axles provide higher torsional strength and resist bending under vertical pressure. Avoid unrated or second-hand axles. These parts have unknown histories and may contain internal stress fractures. Always install new, rated axles with matching hubs to ensure the bearings seat correctly and the wheels remain secure.
Suspension Systems and Couplings
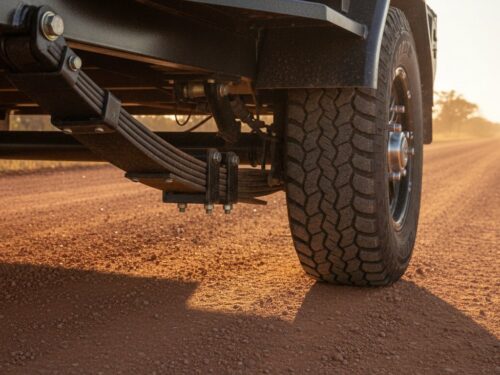
The suspension system controls how the trailer tracks and dampens road vibrations. Four-leaf slipper springs are a reliable, cost-effective option for light builds. For increased durability and load management, five-leaf eye-to-eye springs offer better performance. Tandem axle builds require rocker roller spring sets. These sets distribute the load across both axles when crossing uneven terrain, preventing a single axle from carrying the entire weight. This load-sharing design reduces frame stress.
Match your coupling to the specific braking system installed on the trailer. A 4-hole over-ride coupling is standard for mechanical drum brakes. If the build uses 10-inch electric drum brakes, a fixed coupling is required. Verify that the drawbar bolt pattern matches the couplings base exactly. Secure the suspension to the axle using galvanised U-bolts to prevent movement and resist corrosion. Correct component matching is a primary step in avoiding common trailer building mistakes during the assembly phase.
Common Structural and Fabrication Errors
Structural integrity is the backbone of a safe trailer. Even high-rated components will fail if the frame cannot support the stress of highway speeds and heavy loads. A major part of avoiding common trailer building mistakes is ensuring your welds are deep and your geometry is sound. Cold welds are a frequent hazard. These occur when the base metal doesn’t reach the correct temperature, resulting in a surface-level bond that snaps under tension. This is particularly dangerous where the drawbar meets the main chassis.
Every structural choice influences the performance of your safety systems. When you install brakes and calipers, the mounting plates must be perfectly aligned and welded with full penetration. Misalignment causes uneven pad wear and reduces stopping power. Ensure all mounting surfaces are clean and flat before welding to prevent vibrations that can loosen hardware over time.
Drawbar Design and Geometry
Drawbar length dictates how the trailer behaves during tight turns and reversing. A drawbar that’s too short will strike the tow vehicle’s bumper during sharp manoeuvres. Conversely, an excessively long drawbar increases the leverage on the chassis, which can lead to metal fatigue. Aim for a length that allows at least 90 degrees of clearance between the vehicle and the trailer corner. This provides enough room for jackknifing during difficult reverse parking without damaging the tow vehicle.
A-frame drawbars are superior to single-pole designs for most applications. They distribute the towing force across two points of the chassis rather than one. This reduces the risk of the main frame twisting under load. Ensure your bracing doesn’t create “hard points” where the steel is too rigid. A chassis needs a small amount of controlled flex to handle road vibrations without cracking. Proper geometry is a core requirement for avoiding common trailer building mistakes that lead to long-term structural failure.
Tipping Mechanism and Tailgate Locks
Hydraulic builds require precise engineering to ensure the load discharges cleanly. If the tipping angle is too shallow, materials like wet sand or gravel will stick to the floor. This creates a top-heavy situation that can tip the entire trailer over on uneven ground. Most effective tipper designs aim for a minimum 45-degree angle. Check that the hydraulic ram has sufficient clearance throughout its entire stroke to prevent binding against the frame.
Tailgate locks are safety-critical features. A weak lock can burst open under the pressure of a shifting load, creating a hazard for following traffic. Use heavy-duty latches that secure the tailgate at multiple points. Ensure hinges are aligned perfectly during the fabrication phase. Misaligned hinges cause the tailgate to bind, leading to premature wear and eventual failure of the locking mechanism. Solid fabrication ensures your trailer remains a reliable tool for years.
Calculating Weight Distribution and Axle Placement
Axle placement determines if the trailer tracks straight or oscillates under load. Many builders place the axle in the center of the bed for symmetry. This is a technical error. Avoiding common trailer building mistakes requires a focus on the physics of weight distribution. You must maintain approximately 10% of the total loaded weight on the tow ball. Without this downward pressure, the trailer can lift the rear of the vehicle, reducing traction and steering response at highway speeds.
The 60/40 rule is the industry standard. You want 60% of the load area forward of the axle center line. This geometry shifts the center of gravity forward. A rear-heavy design creates high-speed oscillation that is difficult to correct once it begins. Proper placement ensures the trailer follows the vehicle’s path faithfully during sudden lane changes. If you have specific questions about your frame geometry, contact us for technical advice before finalizing your axle hangers.
The Formula for Axle Positioning
Calculating the axle center point requires a logical sequence. First, measure the total length of the cargo bed. Second, multiply this measurement by 0.6. Third, measure that distance back from the front of the cargo area. Fourth, mark this point as your axle center. Fifth, adjust this position based on planned accessories. If you mount a heavy toolbox on the drawbar, you may need to move the axle slightly forward to prevent excessive ball weight. If you carry heavy ramps at the rear, move it further back to compensate.
Hitch height also influences weight distribution. A trailer that isn’t level puts uneven pressure on the suspension and the tow vehicle’s rear axle. Ensure the frame sits level when hitched. If the vehicle is taller than the trailer’s coupling, use a drop hitch to correct the angle. Maintaining a level frame prevents the trailer from pushing the vehicle during heavy braking. This is a core part of avoiding common trailer building mistakes that impact handling and tyre wear.
Optimising for Marine Applications
Marine builds have unique requirements because the weight is inherently rear-biased. In jet ski trailers, the engine is located at the back of the craft. Placing the axle according to standard utility rules will result in a tail-heavy trailer. You must move the axle further toward the rear of the frame to compensate for the engine weight. This ensures the tow ball maintains the necessary downward pressure for highway stability and prevents the trailer from lifting the tow vehicle’s rear wheels.
Use adjustable axle hangers secured with galvanised U-bolts for these frames. This hardware allows you to slide the axle position after the craft is loaded for the first time. It’s more efficient to adjust a bolt-on hanger than to cut and re-weld fixed points. This flexibility allows you to fine-tune the center of gravity as the build progresses. Proper adjustment ensures the trailer remains level and the vehicle’s rear suspension isn’t overloaded by excessive leverage.
Material Selection and Final Safety Inspection
The finishing phase determines the trailer’s lifespan and resistance to the elements. Avoiding common trailer building mistakes at this stage prevents premature rust and electrical failure. High-quality materials and a systematic final check are the final steps in ensuring a road-ready build. A trailer that fails its inspection due to poor lighting or corrosion is a costly setback. Use components specifically designed for Australian conditions to ensure long-term durability.
A disciplined final walkthrough is essential before seeking registration. This process verifies that every mechanical and structural element functions as a unified system. Check that the braking response is immediate and that all fasteners are secure. Sourcing your components from a specialist trailer parts supplier ensures that each item meets the necessary standards for safety and compliance.
Corrosion Resistance and Longevity
Hot-dipped galvanising is the standard for Australian trailers. Unlike paint, which only provides a surface layer, galvanising creates a metallurgical bond with the steel. This process protects both the internal and external surfaces of the chassis. Paint chips easily from road debris, which allows rust to spread rapidly beneath the coating. Galvanised steel resists this type of degradation and requires significantly less maintenance over the life of the trailer.
Galvanised hardware is also necessary for all external fittings. Use galvanised brackets and U-bolts to prevent “tea staining” and structural weakening. In coastal or marine environments, raw steel will fail quickly. Proper material selection ensures the frame remains structurally sound and the safety chain attachment points do not corrode. This proactive approach to material selection is a key part of avoiding common trailer building mistakes.
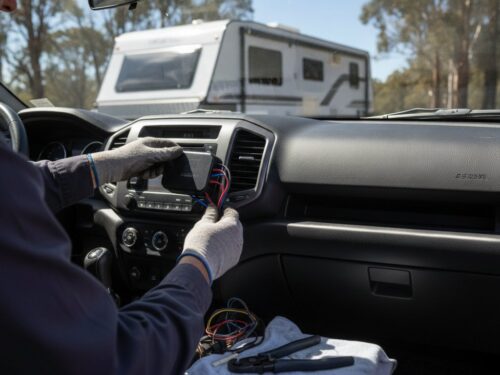
Electrical and Lighting Compliance
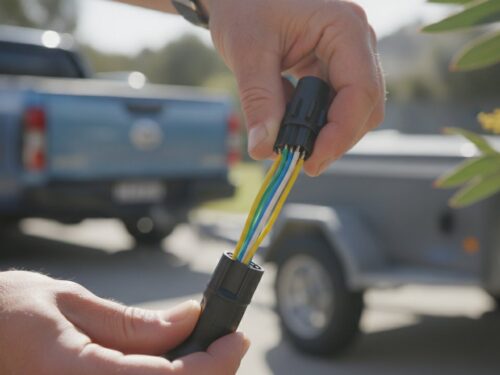
Reliable lighting is a mandatory safety requirement. Use LED submersible tail lights for all marine builds, including boat trailer parts. Standard incandescent bulbs often fail when hot glass contacts cold water. Ensure the trailer plug is wired according to the Australian 7-pin standard. Side marker lights are also required for trailers wider than 2.1 metres to ensure the load is visible to other road users at night.
Complete your build with this final inspection checklist:
- Verify that wheel bearings are correctly greased and seated.
- Ensure all wheel nuts are torqued to the manufacturer’s specifications.
- Confirm the VIN plate is permanently fixed and legible.
- Test all indicators, brake lights, and clearance lamps for correct operation.
- Check that the safety chain and rated hammerlock are secure.
A thorough final check provides peace of mind before the first tow. When every component is verified and the materials are chosen for durability, the trailer will perform reliably for years. Proper finishing is the hallmark of a professional-grade build.
Build for Long-Term Road Safety
A safe trailer starts with a clear understanding of ADR requirements and ends with a rigorous final inspection. Matching your axle and suspension capacity to your intended ATM is the only way to ensure compliance and durability. By focusing on avoiding common trailer building mistakes, such as incorrect weight distribution or poor material selection, you protect your investment and ensure stable handling at highway speeds. It’s vital to remember that proper planning prevents mechanical failure and ensures your trailer follows your vehicle faithfully on every journey.
Superior Trailer Parts is Australian-owned and operated with a long history of serving the local industry. We understand the demands of our unique environment because we’re local too. We provide heavy-duty components designed for resilience and offer nationwide shipping on all components. Our team stands behind every product we sell, offering the technical support you need for a successful build. Browse our range of ADR-compliant trailer parts and components to find everything you need for your next project. Get your build right the first time and hit the road with confidence.
Frequently Asked Questions
Do I legally need brakes on my custom-built trailer?
You must install brakes on any trailer with an Aggregate Trailer Mass (ATM) exceeding 750kg. Trailers below this weight don’t legally require them, but adding them improves stopping performance. For trailers between 751kg and 2,000kg, you can use mechanical or hydraulic over-ride systems. Once you exceed 2,000kg, Australian Design Rules require a break-away system and brakes on all wheels to ensure safe operation during a disconnect.
Can I weld the safety chain directly to the trailer drawbar?
Don’t weld safety chain links directly to the drawbar. The intense heat from the welding process changes the molecular properties of the steel, making the chain brittle and prone to snapping under tension. Use a rated attachment point or a hammerlock instead. This ensures the chain retains its full rated capacity and meets inspection standards for avoiding common trailer building mistakes that lead to registration failure.
How far back should the axle be placed on a box trailer?
Place the axle center line so that 60% of the cargo area is forward of the axle and 40% is behind it. This positioning creates the necessary tow ball weight for stability. If you place the axle too far forward, the trailer will be tail-heavy and prone to swaying. Always measure from the front of the load area rather than the tip of the drawbar to ensure the center of gravity remains forward.
What is the difference between Slipper and Eye-to-Eye leaf springs?
Slipper springs feature a fixed front eye and a rear end that slides within a keeper. They are cost-effective and reliable for light-duty utility trailers. Eye-to-Eye springs have a fixed eye at both ends, connected to the frame via shackles. This design provides superior dampening and is more durable for heavy-duty applications. Choose 5 leaf eye-to-eye springs for trailers that regularly carry maximum loads over long distances.
Why is my trailer swaying at high speeds?
Sway is usually caused by insufficient tow ball weight or incorrect axle placement. If too much weight sits behind the axle, the trailer will oscillate at highway speeds. Check that your load is distributed with 60% toward the front of the trailer. Other causes include under-inflated tyres or worn suspension components. Avoiding common trailer building mistakes like these is essential for maintaining vehicle control and preventing highway accidents.
What information must be included on a trailer VIN plate?
A compliant VIN plate must include the manufacturer’s name, the unique 17-character Vehicle Identification Number, and the build date. You must also list the Aggregate Trailer Mass (ATM) and the Gross Trailer Mass (GTM). Include tyre and rim specifications along with the recommended cold inflation pressure. This plate must be permanently fixed to the trailer chassis in a visible location to be valid for registration.
Should I use galvanised or painted steel for my trailer frame?
Use hot-dipped galvanised steel for maximum corrosion resistance and longevity. Paint provides a surface coating that chips easily and allows rust to spread underneath the finish. Galvanising creates a metallurgical bond that protects the steel both inside and out. It is the best choice for trailers exposed to the elements or used in marine environments. Galvanised hardware also prevents structural weakening caused by long-term exposure to harsh conditions.
What is the maximum width allowed for a trailer in Australia?
The maximum legal width for a trailer in Australia is 2.5 metres. This measurement includes all external fittings such as wheel arches, lights, and hinges. If your trailer is wider than 2.1 metres, you must also fit front and rear clearance lamps to remain compliant. Always measure the widest point of the finished build to ensure you don’t exceed this limit and face fines or registration rejection.