A single non-compliant component or an unmatched axle rating can stall your registration process before it even begins. Building a trailer in Australia requires more than just welding skills; it demands a precise hardware selection that aligns with the Australian Design Rules and Vehicle Standards Bulletin 1. You want a trailer that is durable enough for local conditions and compliant enough to pass inspection on the first attempt. This DIY trailer build parts list australia provides a professional-grade breakdown of every weight-rated part required for a road-legal project.
It’s easy to focus on the frame while forgetting the small hardware like grease caps or split pins that keep you on the road. We provide a clear shopping list that covers everything from 50mm square axles and electric drum brakes to rocker roller spring sets and submersible LED lights. You will find the technical details needed to match spring capacities to axle ratings with confidence. This breakdown ensures your components work together as a cohesive system, preparing you for a successful ROVER portal application and a hassle-free registration process.
Key Takeaways
- Align your component selection with Aggregate Trailer Mass (ATM) to ensure the build meets Australian Design Rules and safety standards.
- Differentiate between 39mm round and 50mm square axles to select the correct load-bearing capacity for your specific trailer dimensions.
- Clarify legal braking requirements to determine when your project requires 10-inch electric drum brakes or mechanical systems.
- Review a DIY trailer build parts list australia that includes essential hardware like galvanised U-bolts, couplings, and submersible LED lights.
- Learn why sourcing weight-matched components from a single specialist ensures part compatibility and a more efficient registration process.
Planning Your Build: ATM Ratings and Australian Standards
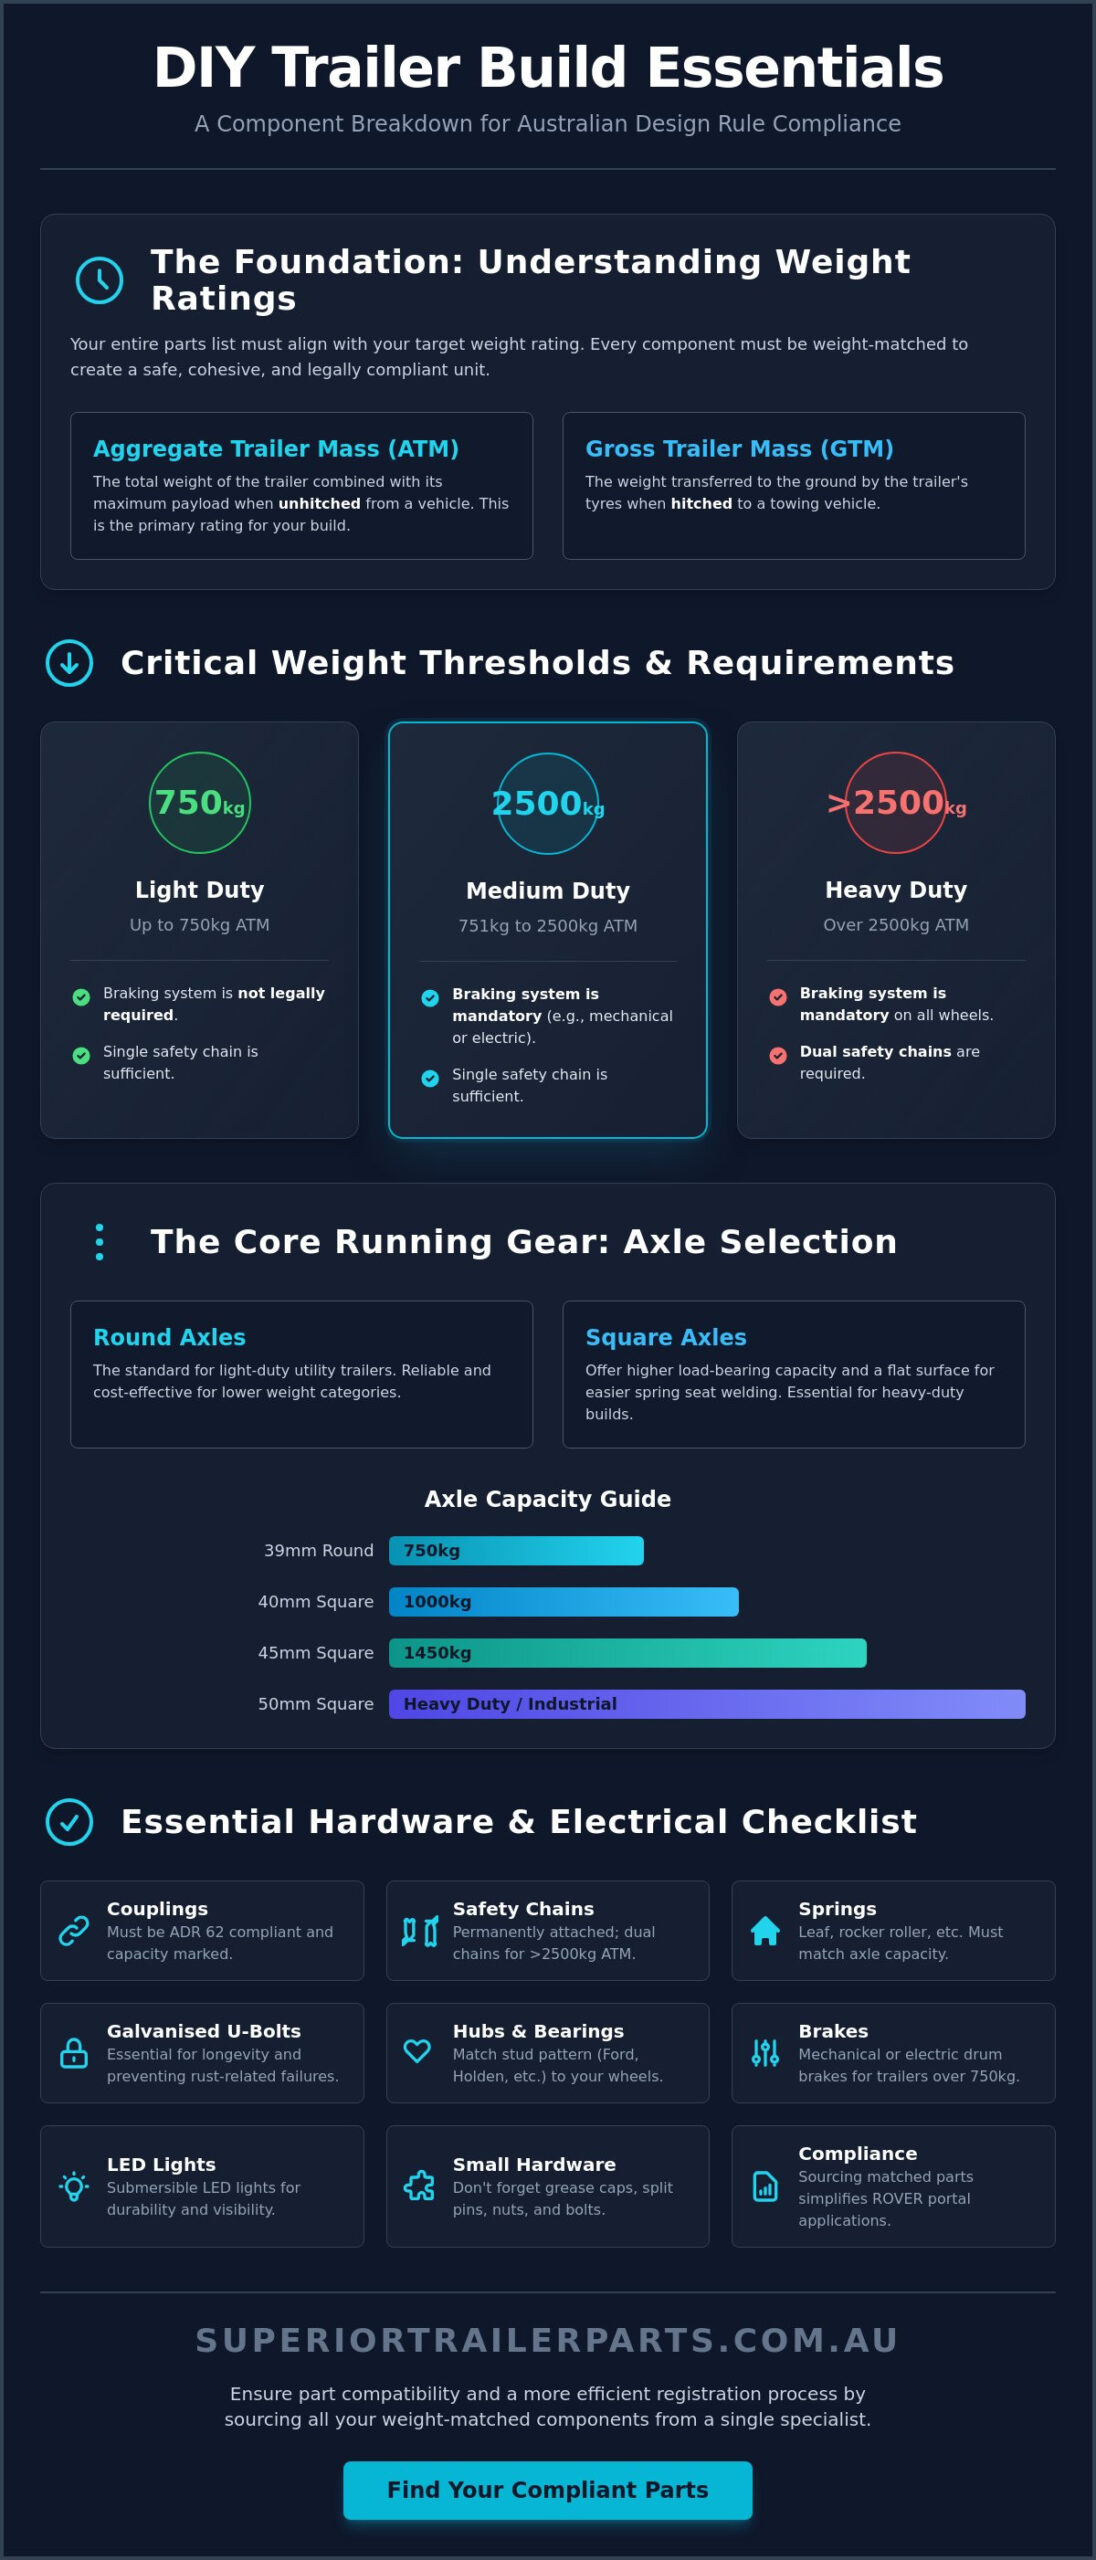
Success starts with a calculator, not a welder. Before you purchase a single length of steel, you must define the weight limits of your project. In the Australian market, two primary metrics dictate your design: Aggregate Trailer Mass (ATM) and Gross Trailer Mass (GTM). ATM is the total weight of the trailer and its maximum payload while it’s unhitched. GTM refers to the weight transmitted to the ground by the trailer’s tyres when it’s coupled to a towing vehicle. These figures are the foundation of your DIY trailer build parts list australia.
Your parts list must align perfectly with your target weight rating. If you plan a build for a 2000kg ATM but install a 750kg rated axle, your trailer is legally restricted to that lower limit. Every component must be weight-matched to ensure the assembly functions as a safe, cohesive unit. Compliance is mandatory for road use. All trailers must adhere to the Australian Design Rules (ADRs), which establish national standards for safety and structural integrity. Choosing galvanised or high-tensile components, such as galvanised U-bolts, is essential for longevity in harsh local conditions. Rust is a leading cause of registration failure; don’t compromise on finish.
Understanding Weight Categories for Registration
The 750kg ATM threshold is a critical dividing line. Trailers at or below this weight don’t legally require a braking system. This simplifies the build but limits your hauling capacity to light utility work. Once you exceed 750kg, the requirements become more complex. You must integrate braking systems and, for trailers over 2500kg, dual safety chains are required. Component ratings directly dictate the final legal capacity of the build. If your 45mm square axles and leaf springs are only rated for 1500kg, you cannot register the trailer for a higher ATM, regardless of frame strength.
The Role of ADR 62 in Component Selection
ADR 62 outlines the technical requirements for mechanical connections, specifically focusing on couplings and safety chains. You must ensure that your safety chains are permanently attached to the trailer and possess a load rating that matches or exceeds the ATM. Couplings must be clearly marked with their capacity and the manufacturer’s name. Using Australian-certified structural parts ensures your build is fit for purpose. This certification provides the necessary documentation for a successful ROVER portal application and ensures your trailer is safe for the public road network.
The Core Running Gear: Axles, Hubs, and Bearings
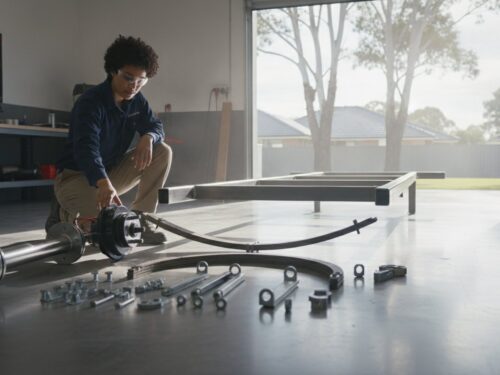
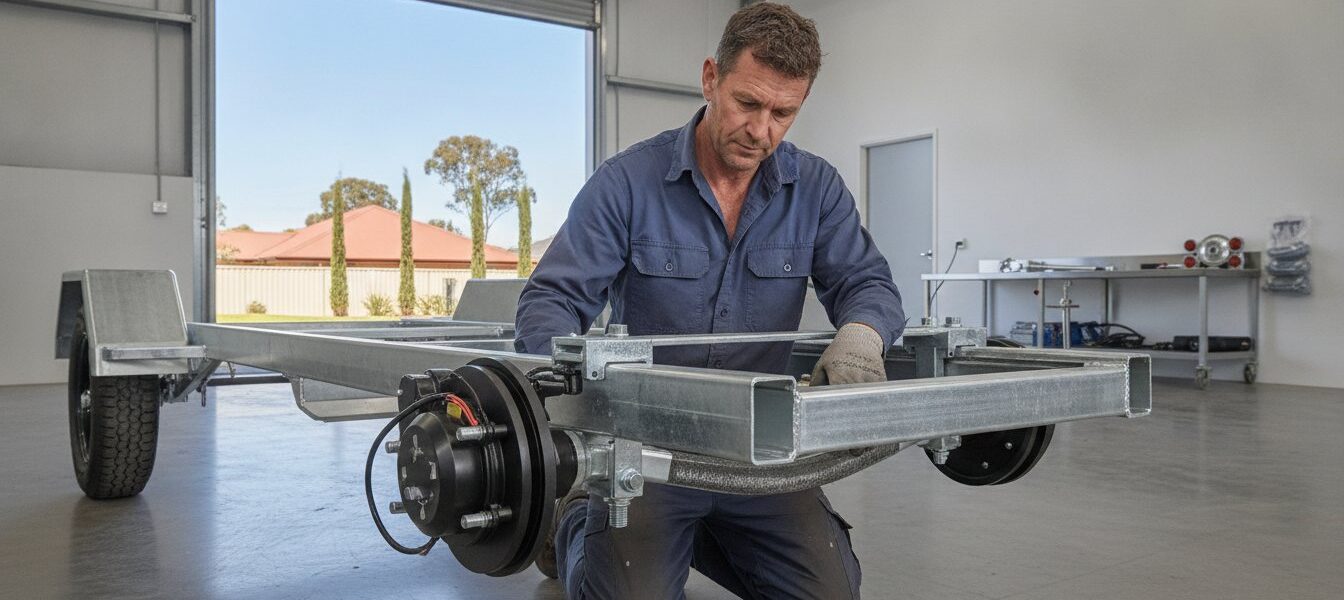
The axle is the backbone of your trailer. While the frame provides the shape, the axle translates the load to the road. When finalizing your DIY trailer build parts list australia, you must choose between round and square profiles based on your intended use. Round axles are the standard for light-duty utility trailers. Square axles offer a flatter surface for easier spring seat welding and generally provide higher load-bearing capacities. The diameter of the axle is the primary indicator of its strength. A thicker axle isn’t just about durability; it’s a legal requirement for higher weight ratings.
Precision measurement is non-negotiable. Builders often confuse “tip-to-tip” length with “hub-face-to-hub-face” distance. Tip-to-tip is the total length of the steel bar including the threaded ends. Hub-face-to-hub-face is the distance between the flat surfaces where the wheel rims sit. This measurement determines your wheel track and ensures the tyres don’t rub against the chassis or mudguards. You also need to match your hubs to your existing wheels. Common Australian stud patterns include Ford (5-stud), Holden (HT or HQ), and LandCruiser (6-stud). If you’re unsure which pattern fits your rims, it’s best to measure the pitch circle diameter (PCD) before ordering.
Axle Specifications for DIY Builds
Selecting the right axle depends on your target ATM. A 39mm round axle is the reliable choice for 750kg light-duty box trailers. If your project requires more muscle, 40mm and 45mm square axles step up the ratings to 1000kg and 1450kg respectively. For heavy-duty tandem or commercial builds, 50mm square axles are essential. These provide the rigidity needed to handle industrial loads without bowing. You can browse our full range of Australian-spec axles to find the exact match for your weight requirements.
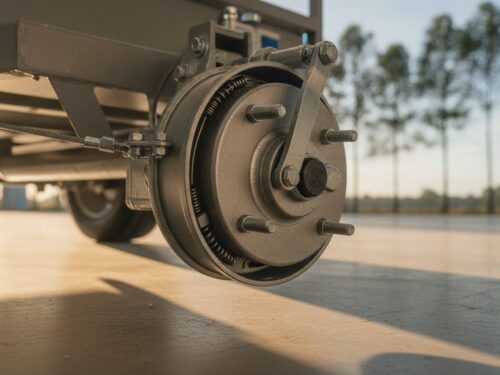
Hubs, Bearings, and Seals
Bearings must match the axle spindle. Most 39mm and 40mm axles use LM (Holden) bearing sets, while 45mm axles typically require SL (Slimline) bearings. The Caravan Industry Association of Australia emphasizes that bearing maintenance is the most critical factor in trailer safety. High-quality marine seals are vital for boat or jet ski trailers to prevent saltwater from corroding the internals. Don’t overlook the small hardware; grease caps and split pins are non-negotiable checklist items that keep your hubs secure and lubricated. If you’re building a specialized watercraft carrier, consider using dedicated boat trailer parts designed for submersion.
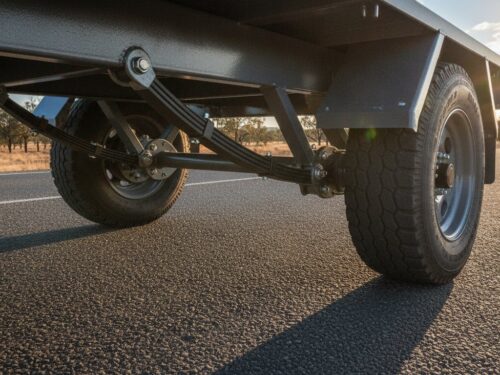
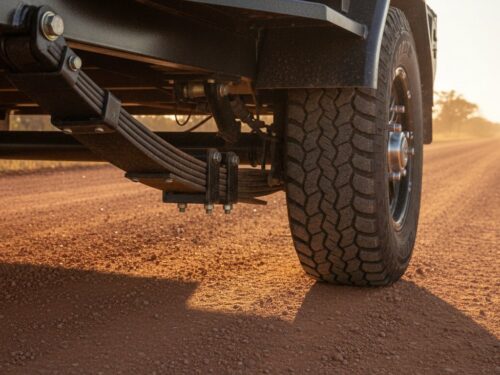
Suspension and Braking Systems for Different Load Capacities
Load capacity determines the complexity of your suspension and braking setup. While a light utility trailer might use simple slipper springs, a heavy-duty transporter requires a more robust arrangement. Your DIY trailer build parts list australia must account for the physical stress placed on these parts during transit. Matching the leaf count of your springs to the intended load prevents the trailer from bouncing when empty or sagging when full. Consider these factors when selecting your suspension:
- Total Payload: Ensure the combined spring rating exceeds your target Aggregate Trailer Mass (ATM).
- Axle Configuration: Single axle builds typically use slipper or eye-to-eye springs, while tandem setups require specialized kits.
- Terrain: Heavy-duty or off-road projects benefit from the increased movement and weight distribution of rocker roller systems.
Braking requirements are governed by weight. Any trailer with a GTM exceeding 750kg must be fitted with an efficient braking system. For trailers between 750kg and 2000kg, a mechanical over-ride system is often sufficient. Once you exceed the 2000kg mark, Australian regulations require power-operated brakes, typically electric, controlled from the driver’s seat. Choosing the right system is a matter of safety and legal compliance. Using unmatched components can lead to uneven braking or premature wear on your towing vehicle.
Leaf Spring Selection
Your choice of springs affects how the trailer tracks behind the vehicle. 4 Leaf Slipper Springs are the standard, cost-effective solution for light box trailers. They are simple to install but offer less dampening than other designs. For tandem setups, 5 Leaf Eye-to-Eye Springs provide improved durability and a smoother ride by allowing the spring to pivot at both ends. If you are building a heavy-duty tandem axle trailer, Rocker Roller Spring Sets are the gold standard. They use a central rocker to distribute weight evenly between the two axles, which is vital for traversing uneven terrain. You can view leaf spring options and hanger kits to find the right capacity for your frame.
Braking System Components
The hardware you select must match your towing vehicle’s capabilities and the trailer’s weight. 9 Inch Mechanical Drum Brakes are simple, reliable components for trailers up to 1400kg. They operate via a cable connected to an over-ride coupling. For trailers over 2000kg, 10 Inch Electric Drum Brakes are the preferred choice. These offer superior stopping power and allow for fine-tuning via an in-car brake controller. Hydraulic Disc Brake Kits are another option, particularly essential for boat trailer builds where drum components would quickly succumb to corrosion. To ensure you make the right choice for your project, learn more about selecting trailer brakes and calipers before making a purchase.
The Essential Hardware and Electrical Parts List
Small components often cause the most delays during a registration inspection. While the axle and suspension form the core, your DIY trailer build parts list australia isn’t finished until you account for every fastener, light, and coupling. These parts ensure your trailer remains securely attached to your vehicle and visible to other road users. Missing a single split pin or using an unrated D-shackle can result in a failed compliance check. Focus on high-quality hardware that withstands the vibration and environmental stress of Australian roads.
Couplings and Safety Hardware
Select a coupling based on your trailer’s ATM and braking system. A 2-hole or 3-hole fixed coupling is standard for unbraked trailers under 750kg. If your build exceeds this weight, you’ll likely need a 4-hole over-ride coupling to activate mechanical brakes. For off-road projects, Poly Block Off-Road Couplings provide the necessary articulation for uneven tracks. Every coupling must be ADR-compliant and clearly rated. Don’t forget the safety chains; they must be permanently attached with rated D-shackles that meet Australian standards. This connection is your final line of defense if a mechanical failure occurs.
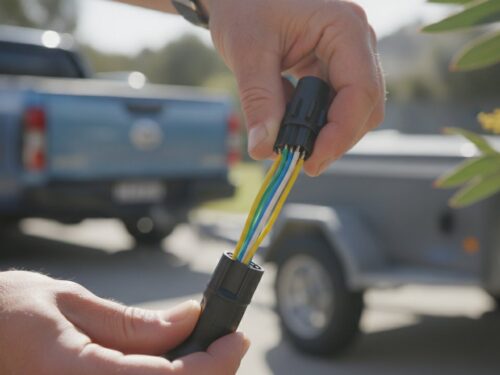
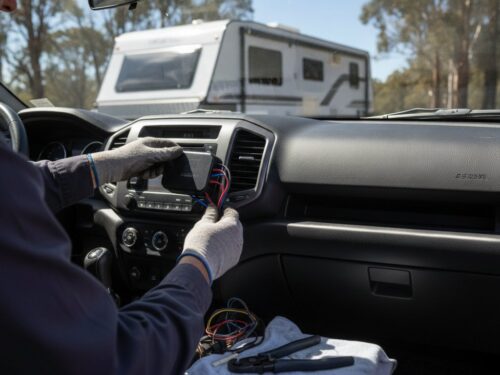
Electrical and Lighting Checklist
Electrical reliability is non-negotiable for road-legal trailers. LED Submersible Tail Lights are the industry standard because they resist vibration and water ingress. You’ll need to choose between a 7-pin or 12-pin trailer plug to match your tow vehicle. A 12-pin connection is often required if you’re running internal trailer lights or charging an auxiliary battery. Your checklist must also include side markers, reflectors, and a dedicated number plate light. Referencing a trailer plug wiring guide ensures your connections follow the Australian standard, preventing blown fuses or erratic light behavior.
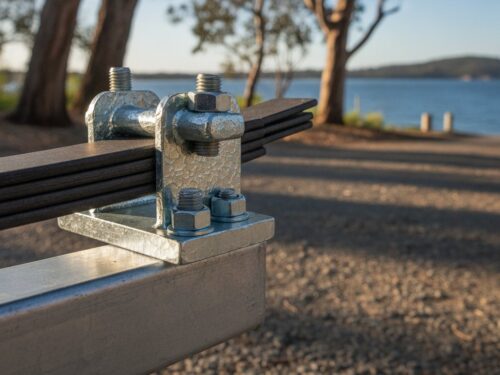
Fasteners and Mounting
Secure your running gear with galvanised U-bolt kits. These fasteners must match your axle diameter and the width of your leaf springs exactly. Using raw steel U-bolts is a mistake; they corrode quickly and can compromise the structural integrity of your suspension. Ensure your spring hanger kits include high-tensile shackle bolts and greasable pins where applicable. These small parts keep the suspension moving freely and prevent premature wear on the spring eyes. High-tensile fasteners are essential for any component that takes a direct load from the road.
Getting the small details right saves time and money during the final inspection. Shop our full inventory of trailer hardware and electrical components to ensure your project meets every Australian standard.
Assembly Logistics and Sourcing Your Components
Sourcing your components from a single specialist is a strategic decision. It eliminates the risk of receiving parts with incompatible tolerances. When you finalize your DIY trailer build parts list australia, you need every component to fit the first time. Mixing and matching items from multiple vendors often leads to issues with bearing seat diameters or U-bolt pitch. A single-source approach ensures that your 50mm square axles are perfectly matched to your 10-inch electric drum brakes and bearing sets. This precision is the difference between a smooth build and a project stalled by mechanical errors.
Logistics also play a role in your project timeline. Heavy items like axles and rocker roller spring sets require specialized shipping. Sourcing locally within Australia reduces lead times. It ensures the gear hasn’t been damaged in long-haul international transit. You gain access to professional advice from experts who deal with these components daily. This support is invaluable when you are determining the correct placement of spring hangers or selecting the right coupling for your ATM. Local sourcing also provides a clear path for operational accountability if you need technical support during the assembly phase.
Why Component Compatibility Matters
Hubs must seat perfectly on axles. U-bolts must match the leaf spring width. Using a single supplier ensures these specifications are verified before dispatch. The mismatched parts trap often occurs when builders buy hubs from one source and axles from another. Even minor differences in machining can cause bearing failure. Pre-assembled kits are a valuable option for first-time builders. They simplify the process by bundling all the small, essential hardware. Our technical support provides a direct line to experts who understand the harsh conditions your trailer must endure.
Next Steps: From Parts List to Finished Trailer
Prepare your workspace with proper stands and a level floor. Organize your welding schedule to ensure the chassis remains square throughout the fabrication process. Fabrication requires precision. If you are unsure about your weld penetration or chassis design, seek professional guidance. Bolt-on assembly of running gear should only occur after the frame is fully treated. Before you head to the registration office, perform a final safety check. A professional inspection identifies potential issues with light placement or safety chain attachment that could delay your approval. You can contact our team for expert DIY build advice to ensure your project follows your DIY trailer build parts list australia correctly.
Ready to Build Your Road-Legal Trailer?
Success relies on precise weight-matching. Aligning your axle diameter with your target ATM is the only way to ensure legal compliance and road safety. This DIY trailer build parts list australia provides the technical foundation needed to avoid registration delays and costly mechanical failures. Use weight-rated hardware and ADR-compliant electrical systems to build a trailer that lasts. Durability is a requirement, not an option.
Superior Trailer Parts is an established Australian-owned and operated specialist. We provide nationwide shipping on all trailer components to keep your project moving. Our team offers expert technical support to ensure your parts work together as a cohesive system. Build your trailer with professional-grade parts from Superior Trailer Parts today. Your project deserves hardware designed for harsh Australian conditions. Start your build with confidence and get your trailer on the road.
Frequently Asked Questions
Do I need brakes for a DIY trailer in Australia?
You must install brakes if the Gross Trailer Mass (GTM) exceeds 750kg. Trailers with a GTM up to 750kg do not require a braking system. For projects between 750kg and 2000kg, 9-inch mechanical drum brakes are a common, reliable choice. If your build exceeds 2000kg, you are legally required to use power-operated brakes, such as 10-inch electric drum brakes controlled from the cabin.
What is the difference between a 39mm round and a 45mm square axle?
The primary difference is the load-carrying capacity and structural rigidity. A 39mm round axle is rated for 750kg, which suits light utility box trailers. A 45mm square axle is rated for 1450kg, providing the extra strength needed for larger single-axle or tandem setups. Square profiles also offer a flat surface that makes welding spring seats more straightforward during assembly.
Can I use second-hand parts for my DIY trailer build?
Avoid using second-hand structural components for a road-legal project. Australian Design Rules require that all parts are fit for purpose and meet specific load ratings. Used axles or springs often have hidden fatigue or internal corrosion that can lead to mechanical failure. Using new, certified components from a DIY trailer build parts list australia ensures your trailer is safe and compliant for the ROVER portal application.
What are the legal requirements for trailer safety chains in Australia?
Safety chains must be permanently attached to the trailer and possess a load rating that matches or exceeds the Aggregate Trailer Mass (ATM). Trailers with an ATM up to 2.5 tonnes require one safety chain. If your trailer exceeds 2.5 tonnes, you must use two safety chains. Always secure these chains with rated D-shackles that comply with Australian standards to ensure a legal connection.
How do I choose the right stud pattern for my trailer hubs?
Match your hub stud pattern to the rims you plan to install. The three most common patterns in Australia are Ford (5-stud), Holden (HT or HQ), and LandCruiser (6-stud). You should measure the pitch circle diameter (PCD) of your wheels to confirm the pattern before ordering. Hubs must also be compatible with your specific axle spindle and bearing sets to ensure a secure fit.
Do I need a professional to wire my trailer lights?
You can wire the trailer yourself, but the installation must strictly follow the Australian standard wiring diagram. Every road-legal trailer requires functioning tail lights, brake lights, indicators, and a number plate light. Using LED submersible tail lights is recommended for their durability against vibration. Incorrect wiring can lead to registration failure or cause electrical damage to your towing vehicle’s circuitry.
What is the maximum width allowed for a DIY trailer in Australia?
The maximum width for any trailer in Australia is 2.5 meters. This measurement includes all external fittings like mudguards, hinges, and tie-down rails. The maximum height limit is 4.3 meters, though livestock trailers are permitted up to 4.6 meters. Ensure your design stays within these limits to pass the mandatory physical inspection required by your state or territory transport authority.
How do I register a home-built trailer?
Apply for a Vehicle Identification Number (VIN) through the federal ROVER online portal before seeking registration. This is now a mandatory requirement for all new trailers in Australia. Once you have the VIN and your trailer is on the Register of Approved Vehicles (RAV), visit your local transport authority for an inspection. You will need a weighbridge certificate to confirm the tare mass and documentation proving ADR compliance.